
Bizz Wizz : Setup , Main Menu , Ledger , Phone Book , Invoice Book , Stock Book , Order Book , Creditors , Point of Sale , Business Name , Diary , Wages , Document Manager , Unlock , Backup, Memo
See Also : Ledger Terms , Ledger Menu , Category List , Add / Change Record , Transaction Lists , End of Year Procedure , Bank Reconciliation , Import bank
NOTE: By moving the mouse over the buttons, the help box at the bottom of that screen will give you a brief description of the function of that button.
LEDGER- Bizz Wizz Ledger section is utilised for entering all your Banking Data and End of Year Reports. The Ledger has sections for Reconciling all your Transaction details against your Bank Accounts, listing Creditors and Debtors, End of Year Totals, End of Year Balance Sheet, and caters for all G.S.T requirements.
|
|
How to set up Ledger. (Down loads from web) |
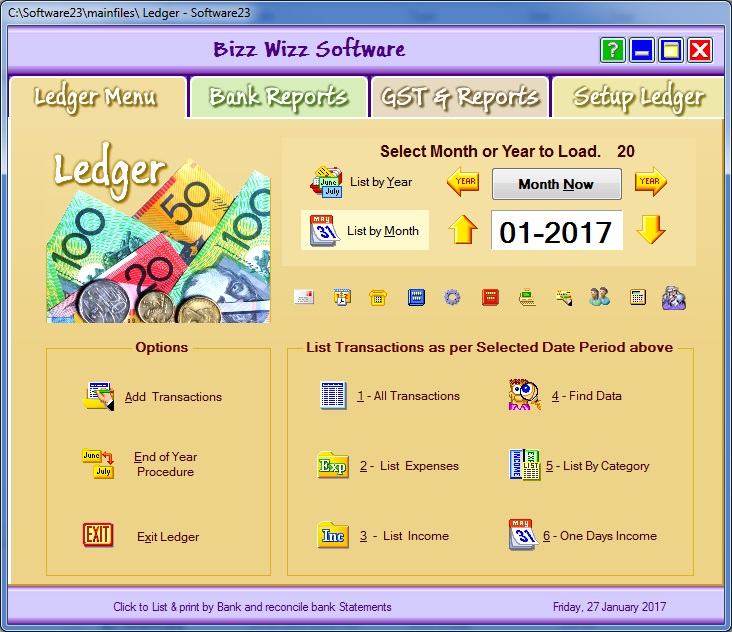
When you bring up the Bizz Wizz Main Menu, move your mouse over the programs tab and click on the [Ledger] button. This will load the main menu of Ledger 'above'.
When you are looking at the main menu ( the tab Ledger Menu). There are
two main sections: Options and List Transactions as per selected date period above.
The three buttons under Options are:
1. Add Transactions- Click to add a new
transaction to the selected month shown.******
2. End of Year Procedure- Click to display
the end of year procedure. ********
3. Exit Ledger- Click to exit the Ledger
module.
The six buttons under List Transactions as per selected period are:
1. All Transactions- This will
list all transactions for the selected month or the selected tax year.******
2. List Expenses- This will list all
expense transactions for the selected month or the selected tax year.****
3. List Income- This will list all
income transactions for the selected month or the selected tax year.****
4. Find Data- This will help you to find data
entered in the selected month or the selected tax year.*****
5. List By Category- This will list all
transactions by category for the selected month or the selected tax year.*****
6. One Days Income- This will list one days
income transactions in the selected month.****
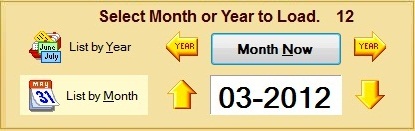
All the options above need to have the date set to load just one month or a year
quarter( x2 or 3) or the full year this is done using the boxes below
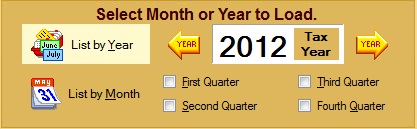
Select Month or Year to Load- When you click on [List By Year] you can
select the Tax Year by clicking on the arrows next to the year field. There are
also four small boxes underneath the displayed year. By clicking on one of these
buttons, you can select which quarter you would like listed. You can click
on all four buttons per quarter if required.
When you click on [List by Month] you can select the Month by clicking on the
arrows next to the month field.

Select Month or Year to Load- When you click on [List By Year] you can
select the Tax Year by clicking on the arrows next to the year field. There are
also four small boxes underneath the displayed year. By clicking on one of these
buttons, you can select which tax quarter you would like listed. You can click
on all four buttons per quarter if required.
When you click on [List by Month] you can select the Month by clicking on the
arrows next to the month field.
Bank Lock - This button will lock and un-lock a bank
highlighted in the list of banks when a bank is locked the reconciled
balance can not be changed.
NOTE all banks should be locked at all times unless you are reconciling a
statement.
Import Bank - Imports a file from the bank off
the internet to do the bank rec.
Reconcile to Statement Date- Use the drop down arrow
box to enter the bank Statement start date you wish to reconcile from. This must be
entered before you start to do a bank reconciliation
This Statement Date is the date for the statement you wish to reconcile it
can be the date of the first Transaction or the last on the statement the Date
is also stored automatically on the transaction when reconciled.
Select Bank To List First- Before you can list records
from a selected bank, you need to choose which bank account that you want to
find the transactions in. To do this, highlight the bank account the transactions
are in and then click on the appropriate field to [List Record for Selected
Bank], eg. to find a transactions that is income un-reconciled from bank account
3, first you need to click on [3-Bank] under the [Select Bank To List First] and
then click on [Income Un-reconciled]. This will then open the Income
Un-reconciled page for [3] Bank in the selected month or year. To lock a bank
account you can either highlight the account you want to lock and then click on
the key and padlock at the top right hand corner of the [Select Bank To List
First] or just double click with your mouse on the bank account you want to
lock.
Change Start Balance- (bottom left) Click here to change the year start balance for the bank selected. This is usually done when you first open your business or annually on July 1st as per each bank accounts balance. You must enter the exact amount as shown on the bank statement so that reconciliation of accounts is done correctly. You do not enter the $ sign, just the amount including the decimal point. Make sure you click OK after entering the amount.
Bank Totals- Click here to view and print bank totals and reconciled balances for the selected bank. The [Bank Year Totals for Bank] page will open. It will show reconciled and un-reconciled Income, Expenses and the Total of Income and Expenses combined. It will display the [Reconciled to Statement Balance] and [Full Bank Balance]. There is a print***** option at the top of the page. The [Scale] field allows you to scale the [Bank Year Totals for Bank] page. Click on the up arrow to enlarge the page or the down arrow to reduce page. Next to the scale field is a field that shows the total number of pages in the Bank Total Report.
Deposit Slip- Click to list the current Deposit List or previous list. You can also print and reset options if required.
List Records for Selected Bank-
1-All Un-reconciled- When you click on [All Un-reconciled], all Income and Expense transaction that have not been reconciled will be listed for the selected bank account in the selected month or year that has been loaded above.
2-All Reconciled- When you click on [All Reconciled], all Income and Expense transactions that have been reconciled will be listed for the selected bank account in the selected month or year that has been loaded above.
3-Expenses Un-reconciled- When you click on [Expenses Un-reconciled], un-reconciled Expense transactions will be listed for the selected bank account in the selected month or year that has been loaded above.
4-Expenses Reconciled- When you click on [Expenses Reconciled], reconciled Expense transactions will be listed for the selected bank account in the selected month or year that has been loaded above.
5-Income Un-reconciled- When you click on [Income Un-reconciled], un-reconciled Income transactions will be listed for the selected bank account in the selected month or year that has been loaded above.
6-Income Reconciled- When you click on [Income Reconciled], reconciled Income transactions will be listed for the selected bank account in the selected month or year that has been loaded above.
7-All Transactions- When you click on [All Transactions], all Income and Expense transactions whether reconciled or un-reconciled will be listed for the selected bank account in the selected month or year that has been loaded above.
8-All Expenses- When you click on [All Expenses], all Expense transactions whether reconciled or un-reconciled will be listed for the selected bank account in the selected month or year that has been loaded above.
9-Find a Transaction- When you click on [Find a Transaction], the Select Category page will open so you can find a transactions for the selected bank account in the selected month or year that has been loaded above.
0-All Income- When you click on [All Income], all Income transactions whether reconciled or un-reconciled will be listed for the selected bank account in the selected month or year that has been loaded above.
New [List One Statement] button to list & total one statement.
Useful if statement total is out when reconciling.
New [All Reconciled to a Statement] button shows reconciled totals up to
a statement. Useful if the balance is out when reconciling.
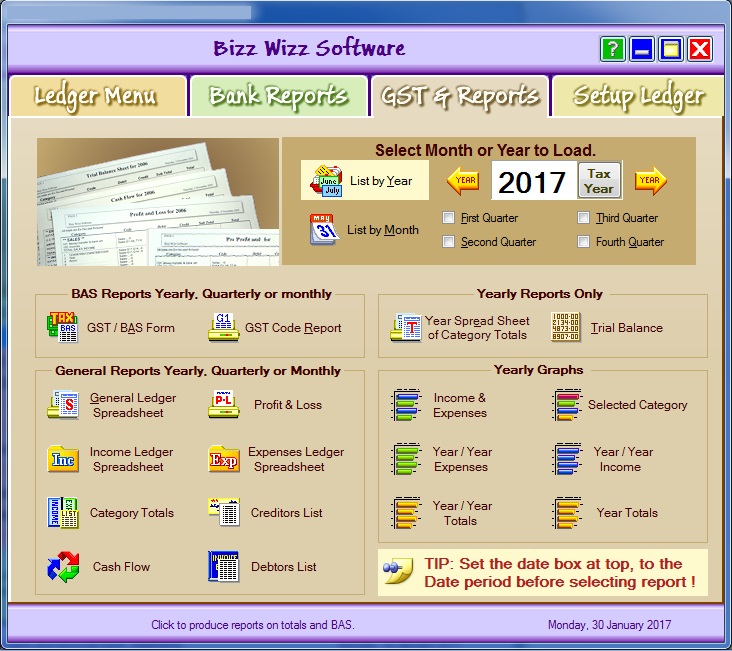
Select Month or Year to Load- Click here to select the month and/or tax year.
Month & Year Reports- When you click here, you will be able to view and print lists for Creditors, Debtors, Profit & Loss, Category Totals and Cash Flow for the selected month or year.
Yearly Graphs- When you click here, you will be able to view and print a Yearly Graph for Income & Expenses, Current Year Totals, Income Totals, Expenses Totals, and Previous and Current Year Totals.
BAS Reports Only- This will open the [GST/BAS
Form] for the selected
year, month or quarter and you will also be able to view or print a breakdown of
the BAS codes.
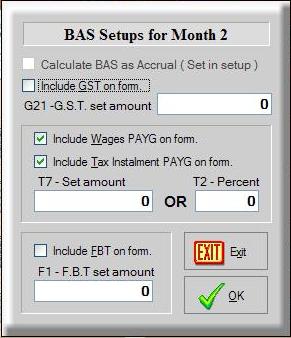
Clicking on the [GST/BAS
Form] will open the BAS Setups page.
There are two options for calculating BAS.
The first option is by CASH. The second option is by ACCRUAL. You will need to
go to [Setup Ledger] GST/BAS Settings to
select ACCRUAL as the default option.
G21-GST Set Amount- Deferred Tax.
T7-Set Amount- Tax Office will provide your set amount OR
T2-Percent- Tax Office will provide your percent to you.
F1-FBT Set Amount- This is the field to enter your Fringe Benefit
Tax.
Yearly Reports Only- Click to view and print a Spread Sheet of a category by month for the selected tax year and to view or print a Trial Balance for the selected tax year.
Printing - If you already have your printer set up click on [Print] to send the Supplier details straight to the printer. [Print Condensed] will condense the Supplier information to be printed. If you need to choose a printer option then click on [Print To] which will bring up your printer options. Choose the printer you would like to send the Supplier details to and click on OK. [Print To Condensed] will condense the Supplier information to be printed as well as choosing the printer you would like to send the Supplier details to and click on OK. If you click on [Export] the [Select Format] page will open. You can choose from PDF ADOBE, HTML, WORD, JPEG or EXCEL. Click on your chosen option and follow the prompts.
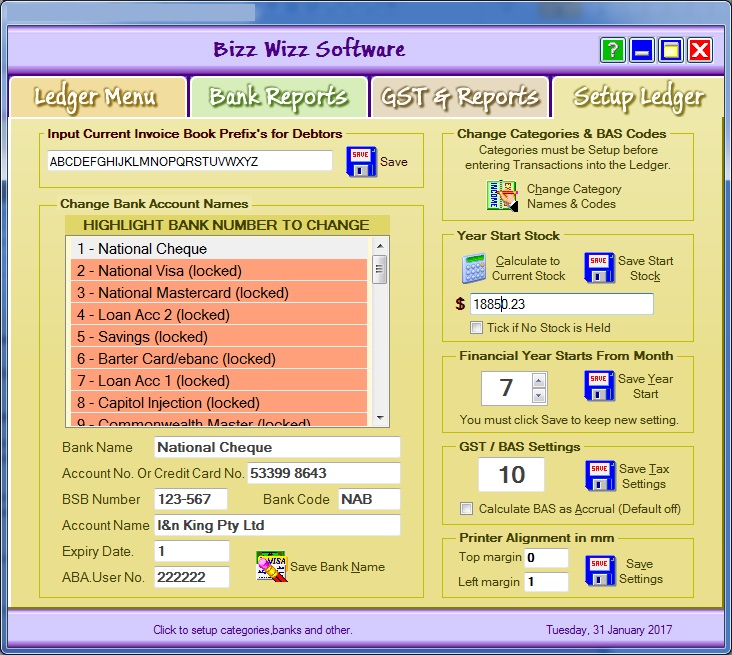
Input Current Invoice Prefix's for Debtors- This is where you enter
the Invoice book prefixes to search for outstanding Debtors. Make sure you
click on [Save prefix's]
Change Bank Account Names- There are 20 Bank Account
fields. Highlight the number (1 up to 20) that you would like to use. Then click
in the [Bank Name] field to enter the Bank details. Then enter the number of the
Bank Account you highlighted into the [Account No.] field. If the Bank Account
is a Credit Card, enter the Card's expiry dates in the [Expiry Date] field, and
the enter the Name that is printed on the Credit Card into the [Name on card]
field.
[Bank Code] is given to you by the bank. It is a 3 letter code .
[ABA user No.] is given to you by the bank if you are sending ABA
files to the bank
You can then click on [Save Bank Name] to save the details you have
entered.
Change Categories & BAS Codes- All Categories MUST BE set up before entering any Transactions into the Ledger. Click on [Change Category Names and Codes] which will open the [Select Category] page. Click link for more help on setting up categories.
Year Start Stock- Enter the [Year Start Stock] figure in this field or use the [Calculate to Current Stock] for Year Start figure. These figures will automatically be entered into the Stock Inventory on the Cash Flow Report. The [Year Start stock] figure is the amount of stock you have at the beginning of the financial year. If you use the [Calculate to Current Stock] then the stock total for the current day will be entered into [Year Start stock].
Make sure you click on [ Save Start Stock ].
Financial Year Starts From Month- Click on the arrows to select the correct month and then click on [Save Year Start] to save the year start figure." July = 7".
GST/BAS Settings- The number [10] will automatically be entered into this field as the Tax quarter default setting. You must click on the small field box [Calculate BAS as Accrual (Default off)] if you are registered for Tax as Accrual. You can then click on [Save Tax Settings] to save the Tax settings you have entered. GST/BAS Form
Printer Alignment in mm- First you need to determine what margin you should enter into the [Top margin] and [Left margin] fields. when you print an item from any section of Bizz Wizz, have a look at the alignment of the printout and determine if you need to make adjustments to the [Top margin] and/or [Left margin] fields. Each printer is different so the alignment should be checked. When you have determined the best alignment, enter the alignment in millimetres into the correct field. Then click on [Save Settings] to save the printer alignment settings.
See Also : Ledger Terms , Ledger Menu , Category List , Add / Change Record , Transaction Lists , End of Year Procedure , Bank Reconciliation