Bizz Wizz : Setup , Main Menu , Ledger , Phone Book , Invoice Book , Stock Book , Order Book , Creditors , Point of Sale , Business Name , Diary , Wages , Document Manager , Unlock , Backup
See Also : Ledger Terms , Ledger Menu , Category List , Add / Change Record , Transaction Lists , End of Year Procedure , Bank Reconciliation , Import bank
NOTE: By moving the mouse over the buttons, the help box at the
bottom of that screen will give you a brief description of the function of that
button.
BANK LIST
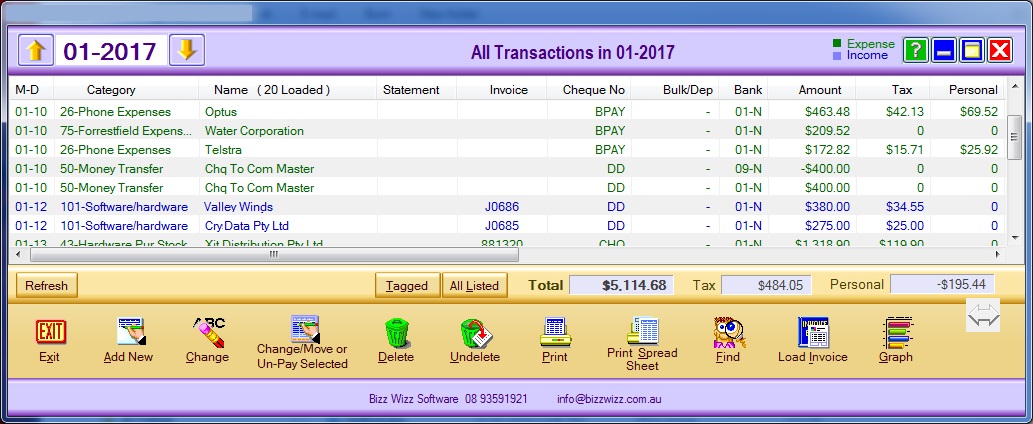
To list transactions in a specific sort order click on the name field on the top of the column and * will be put in the field label to indicate that list is sorted by this field .
Use the scroll bar at the bottom of the screen (left to right) to view further columns
To make the individual columns wider move the mouse over the name field at the top of the column until you get a <-|-> sign. Hold down the mouse and drag to get the width you require for that column.
To move a column from one place to another click on the name field on the top of the screen, hold down the mouse and drag it to where you want it on the screen and drop it.
When you exit the Ledger program all the columns and sizing will return to their original settings.
Transaction List- Buttons
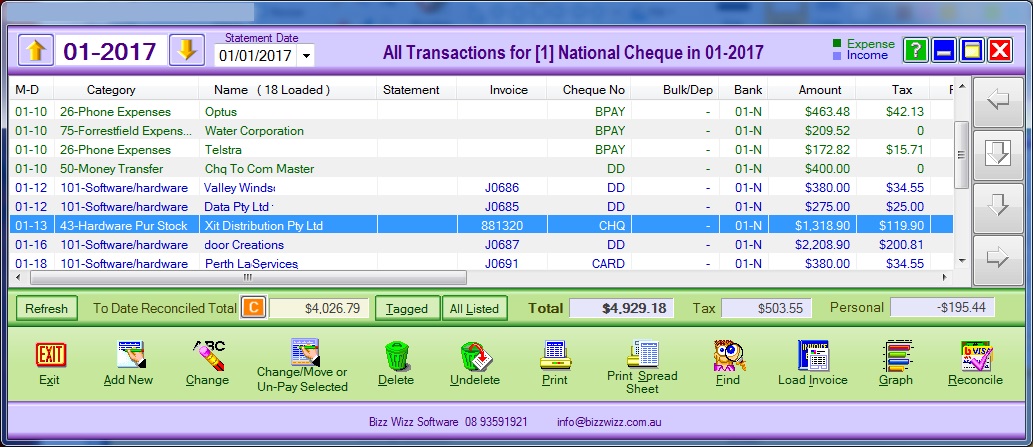
Statement Date- is the date of the Statement to be reconciled
Refresh - This Button reloads the data form the hard disk and will pickup
any change made in other section or by other network users.
Tagged and All Listed buttons - 'Tagged' will show the totals for only
tagged transactions and 'All Listed ' shows totals for all.
Add New- If you need to enter a New Transaction click on [Add New] which
will take you to the Select Category page.
Change- Click here to change a transaction. First highlight the Transaction in the list and then click on this button to make any changes needed to this record. The Change Record page will open so you can make the changes required. Make sure you click on the [OK Save] button after making changes to the Transaction.
Delete- Click here to permanently delete a Transaction off the computer.
Undelete- Click here to undelete the last deleted transaction without closing the program. Only the last transaction can be undeleted.
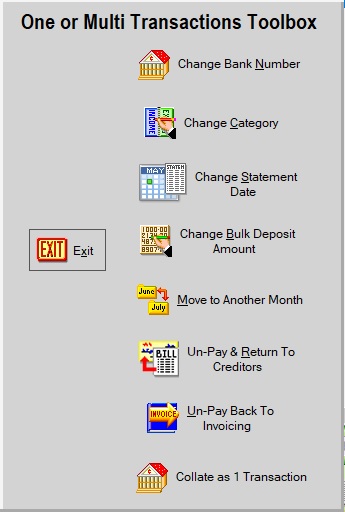
Change\Move all selected- Click here to move all
selected transaction to another
month or Change the category, Statement date, Bulk Deposit and Bank number . Please note that this can only be done if the transaction is not
reconciled or if the Bank Lock is off. To move highlight the transactions, click
on move and arrow down, up or sideways to enter the transactions into the
correct month. The white highlighted field will let you know which month and
year you are in.
To Un-Pay a Expense Transaction to Creditors or an Un-Pay
a Income
Transaction to Invoicing us one of the bottom buttons. These un-pay buttons will
even un-pay a part payment.
Collate as 1 Transaction the best way to see how this works is to
put two transactions in a blank month ,select them and press this button and see
what it will do, there are 2 options when collating so have a play and see how
it works.
Print- When you click on this button a
Print Menu pop up box will open. If you already have your printer set up
click on [Print] to send the Transaction details straight to the printer. [Print
Condensed] will condense the Transaction information to be printed. If you need
to choose a printer option then click on [Print To] which will bring up your
printer options. Choose the printer you would like to send the Transaction
details to and click on OK. [Print To Condensed] will condense the Transaction
information to be printed as well as choosing the printer you would like to send
the Transaction details to and click on OK. If you click on [Export] the [Select
Format] page will open. You can choose from PDF ADOBE, HTML, WORD, JPEG or
EXCEL. Click on your chosen option and follow the prompts.
Spread Print- This will print the transaction in category order subtotalling each category with an ending total.
Find- Click to search for a transaction. This will bring up the Select Category screen. Select the category you wish to search under. If you are not sure which category the transaction is in click on either All Category's or All Expenses or All Income. This will bring up a dialogue box. Type text into the Type text to find in list box you want to search for. This can be anything that is in the search fields. All the fields can be either ticked or un ticked, or you can un tick whichever boxes you want and just have a few or one box ticked. If Only with Statement date is ticked use the drop down arrow to select the date. If Only with Payment Type is ticked use the dropdown arrow to select the method of payment. If Only with Creation Date is ticked use the drop down arrows to select the date. Once all the relevant search options have been ticked click on the All Find button to commence the search.
Load Invoice- Highlight the transaction you want to show the Invoice for and then click on [Load Invoice]. This will show the Invoice for that transaction.
Reconcile Button When a transaction or a number of transactions are highlighted and this button is clicked it will reconcile the transactions turning the N in the bank column to a Y
When you click on button 1 All Transactions on the Ledger Menu tab it will bring up a list of transaction for the month or tax year that has been selected.
Graph Button When this button is ticked a dialogue box pops up and asks if you want to remove Tax and Personal amounts from totals. Click yes or no and the graph will show the Income amount in blue and the expense amount in green for the month or year selected.
Deposit Slip
Click on the Bank reports Tab and underneath the the bank list you will see the Deposit Slip button.
The Include in the Deposit Slip needs to be set to YES in the Invoicing Pay to Ledger screen for the deposit list to be sent to the Ledger.
The deposit slip can be printed and taken to the bank instead of handwriting transactions to be banked in a deposit listing book supplied by a bank. The print rest button needs to be clicked after each bank deposit.
Deposit Slip- Buttons for deposit list.

THE DETAIL'S FOR THE BOTTOM BUTTONS FOR ALL LISTING MODES
IF BUTTON IS NOT SEEN IT MAY BE VISIBLE ONLY IN ANOTHER MODE.
Tick or leave un ticked if you wish to remove Cash, Cheque or other from the bank printout
Refresh button Click this button to refresh the screen
Exit button Clicking on this button will take you to the Bank Reports Tab screen.
Add New- If you need to enter a New Transaction click on [Add New] which will take you to the Select Category page.
Change- Click here to change a transaction. First highlight the Transaction and then click on this button to make any changes needed to this record. The Change Record page will open so you can make the changes required. Make sure you click on the [OK Save] button after making changes to the Transaction record.
Delete- Click here to permanently delete a Transaction off the computer.
Undelete- Click here to undelete the last deleted transaction without closing the program. Only the last transaction can be undeleted.
Print Reset- A small screen will open asking [Do you need a full office copy of this list]. Click on [Yes or No] as required. A Print Menu pop up box will open. If you already have your printer set up click on [Print] to send the Transaction details straight to the printer. If you need to choose a printer option then click on [Print To] which will bring up your printer options. Choose the printer you would like to send the Transaction details to and click on OK. If you click on [Export] the [Select Format] page will open. You can choose from PDF ADOBE, HTML, WORD, JPEG or EXCEL. Click on your chosen option and follow the prompts. Please note that you can not reset the deposit list within 1 hour of the last reset.
Print- A small screen will open asking [Do you need a full office copy of this list]. Click on [Yes] or [No] as required. Then a Print Menu pop up box will open. If you already have your printer set up click on [Print] to send the Transaction details straight to the printer. [Print Condensed] will condense the Transaction information to be printed. If you need to choose a printer option then click on [Print To] which will bring up your printer options. Choose the printer you would like to send the Transaction details to and click on OK. [Print To Condensed] will condense the Transaction information to be printed as well as choosing the printer you would like to send the Transaction details to and click on OK. If you click on [Export] the [Select Format] page will open. You can choose from PDF ADOBE, HTML, WORD, JPEG or EXCEL. Click on your chosen option and follow the prompts.
Old Lists- A small [Select Deposit List] screen will open that displays old deposit lists. Highlight which list you would like to display. Click on [Print ] to print the highlighted deposit list or click on [OK] to open the highlighted deposit list. If you click on [Print ] the Print Menu will open. See notes above for Print Menu options.
Load Invoice- Highlight the transaction you want to show the Invoice for and then click on [Load Invoice]. This will show the Invoice for that transaction.
See Also : Ledger Terms , Ledger Menu , Category List , Add / Change Record , Transaction Lists , End of Year Procedure , Bank Reconciliation