BIZZ WIZZ STOCK
MAIN MENU , COPY
MENU , MAINTENANCE
Bizz Wizz : Setup , Main Menu , Ledger , Phone Book , Invoice Book , Stock Book , Order Book , Creditors , Point of Sale , Business Name , Diary , Wages , Document Manager , Unlock , Backup
See Also : Stock Main Menu , List Parts , Hot keys , Add Stock , Import Stock , Print Barcode , Part Build
NOTE: By moving the mouse over the buttons, the help box at the bottom of that screen will give you a brief description of the function of that button.
STOCK MODULE - Bizz Wizz stock is an integral part of the software. The stock section is utilized for entering and editing of stock details.
When you bring up the Bizz Wizz main menu, click on the [STOCK]
button under programs. This will load the main menu of the stock module.
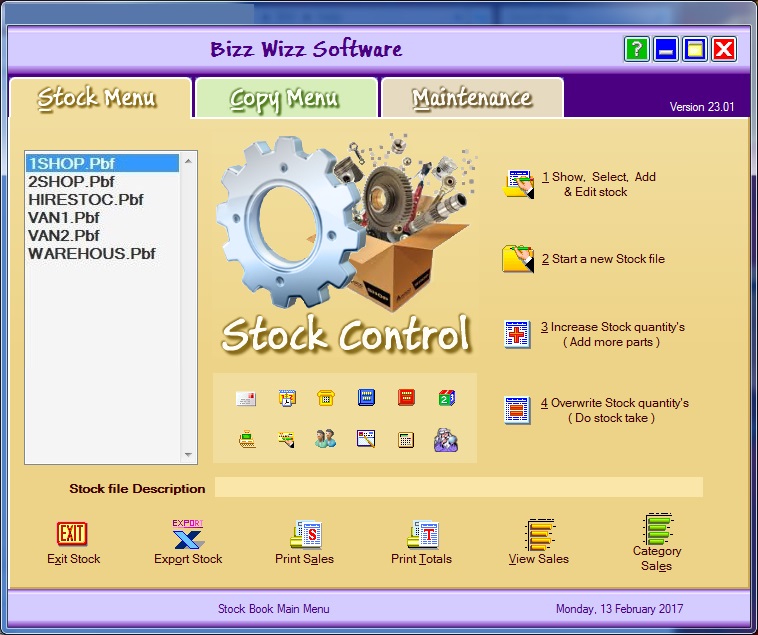
You are now looking at the main stock menu. There
are three tabs - stock menu, copy menu and maintenance.
The buttons on the right hand side of the stock main menu are:
SHOW, SELECT, ADD and EDIT - This button will allow you to show a list of your parts where you can add new parts or edit them. When you click on the [SHOW, SELECT, ADD and EDIT STOCK] button your part selection mode screen will come up. To add a stock item click on [ADD] button then a new part screen comes up. Fill in the screen and when completed click on the [OK SAVE] button. To edit the stock item click on [SHOW, SELECT, ADD and EDIT STOCK] button. Your part selection mode screen will come up, then click on the [CHANGE] button. The change part screen comes up, so then fill in the screen, when completed click on [OK SAVE] button. Refer to Adding Data Section.
START A NEW STOCK FILE - This button will allow you to create a new stock file. Click on the [START A NEW STOCK FILE] button and a start a new stock file screen will come up. Now type in a new file name (only 8 letters with NO punctuation or spaces) when completed click [OK].
INCREASE STOCK QUANTITY - This button allows you to increase stock quantity more easily, now click on [INCREASE STOCK QUANTITY] button and you will see the normal add to stock list screen but it has another feature at this moment, at the top of the screen you will see the title is ADD TO STOCK QUANTITIES MODE this means that you can now highlight a stock item you wish to change and click on the [SELECT] button to change the stock items quantity. You will see that it is the normal change part screen but the cursor is already placed in the INCREASE STOCK BY box, type in the quantity you wish this stock item stock to increase by i.e.. 5 and click on the [OK] button. You will return to the first screen and now select another stock item and repeat until all your list is completed.
OVERWRITE STOCK QUANTITY - This button allows you to overwrite stock quantity more easily for when you are doing stock take, now click on [OVERWRITE STOCK QUANTITY] button and you will see the normal add to stock list screen but it has another feature at this moment, at the top of the screen you will see the title is CHANGE STOCK QUANTITIES MODE this means that you can now highlight a stock item you wish to change and click on the [SELECT] button to change the stock items quantity. You will see that it is the normal change part screen but the cursor is already placed in the CHANGE STOCK TO box, type in the actual quantity you have counted for this stock item i.e.. 10 and click on the [OK] button. You will return to the first screen and now select another stock item and repeat until all your list is completed.
The buttons across the bottom of the stock menu are:
EXPORT STOCK BUTTON - This button will allow you to export price files. Click on the [EXPORT STOCK BUTTON] and the export price files screen comes up. You can leave the default file name or you can type in a name or click on the [BROWSE] button and the Windows based Save as dialog box will come up. Find the file name you wish to use or if you need help on how to do this click on the ?. Then click on the section that you need help on and a windows based help file will come up. Once selected click on the [SAVE] button and click on the check box next to either the comma separated or tab separated. (Comma separated means it will export in a standard text file good for all formats but use Tab separated for excel or word as it seems to import better). Click on the check box to include headers if you want to include the headings and then click on [OK]. A message will come up that says "File export all done" then click on [OK] and you will return to the main stock menu.
PRINT SALES - This button will allow you to print, view or export Sales Reports. Click on the [PRINT SALES] button and then click on [YES] for Total sales for all parts or [NO] for total sales only for stock held tagged items and the print menu comes up.
PRINT TOTALS - This button will allow you to print, export or view Total Valve of Parts (Stock held). Click on [PRINT SALES] button and then click on [YES] to total sales for all parts or [NO] to total sales only for 'stock held' tagged items and the print menu comes up.
VIEW SALES - This button will allow you to print, export or view sales of 'stock held'. Click on the [PRINT SALES] button and then click on [YES] to total sales for all parts or [NO] to total sales only for 'stock held' tagged items and the print menu comes up.
CATEGORY SALES - This button will allow you to print, export or view Sales by Category. Click on the [PRINT SALES] button and then click on [YES] to total sales for all parts or [NO] to total sales only 'stock held' tagged items and the print menu comes up.
EXIT STOCK - This button takes you back to the Bizz Wizz main menu.

When you click on the copy menu tab the above menu comes up. This menu is for when you want to copy a part individually or an entire stock file to another stock file. Click on the stock file you want to copy from and then click on the stock file you want to copy to.
There are three ways to update:
1: COPY BY SELECTING PART
When you click on this button the List Screen will open and you can
Select the part you wish copy to the other file, One part at a time.
NOTE: 'Ask for quantity' in Maintenance Tab must be turned on.
2: COPY ALL PARTS
When you click on this button the full file will copy to the other
file.
3: DO MERGE UPDATE - This section allows you to select merging criteria to update
the stock file from another stock file.
Click on which stock file(s) in the
COPY FROM FILE list, (To select more than one stock file hold down the
Ctrl key on the keyboard and click on each stock file required)
Then click on the
destination file from the COPY TO FILE list.
Tag which option(s)
you wish to use from the Merge by part number to update prices criteria
Click on the [DO MERGE UPDATE] button.

When you click on the maintenance menu tab the above menu comes up. This menu is used to maintain and setup your stock file.
CHANGE FILE NAME - This button allows you to change or
rename a existing stock file,
NB: Make sure you have selected the correct stock file from the stock
file list before you click on the maintenance tab.
Click on
the button and a Rename Stock File popup
will show. Type in the new file name (only 8 letters with NO
punctuation or spaces) and click the [RENAME] button.
DELETE FILE -
This button allows you to delete a stock file.
NB: Make sure you have
selected the correct stock file from the stock menu BEFORE you click on the
maintenance tab.
Click on the button and a delete file message
will come up. Click on [YES] to continue deleting this stock file click
or
[NO] if you do not want to delete this stock file.
UPDATE FILE - This button allows you to update
your complete stock buy price by a percentage rate.
NB: Make sure you have
selected the correct stock file from the stock menu BEFORE you click on the
maintenance tab.
Click on the button, type in the
percentage rate you wish to update the buy price by and click on the [OK]
button.
An Adjust Prices message comes up, so click on [YES] for two decimal places or
click on [NO] for four decimal places. Note (four decimal
places is usually used when the the cost or buy price is very low, for example
1.2329 cents)
UPDATE PARTS - This button allows you to update the
stock buy price by a percentage rate One part at a time,
NB: Make sure you have selected the correct stock file from the stock menu
BEFORE you click on the maintenance tab.
Click on the
button, type in the percentage rate you wish to update the buy price by and
click on the [OK] button.
An Adjust Prices message then comes up. Click on [YES] for two decimal places or
click on [NO] for four decimal places.
You are now in the List Screen in UPDATE
MODE . Highlight the stock item and click on the [SELECT]
button. Repeat
the process until all of the stock items have been updated.
Click
on the [EXIT] button and you will return to the main stock menu
IMPORT DATA -
This button allows you to import supplier price lists
NB: Make sure you have
selected the correct stock file from the stock menu BEFORE you click
on the maintenance tab,
OPTIMIZE FILE -
This button allows you to clean up your stock file.
NB: DO A BACK UP
FIRST then make sure you have selected the
correct stock file from the stock
menu BEFORE you click on the maintenance tab.
If you wish to Optimize just one group of part this can be done by the
group name field , just type in the field name or select from the drop down
list.
To Optimize all just un-tick group name box.
Click on ONLY ONE of the 10
options.
Click on the [OPTIMIZE FILE] button
SAVE SETUPS - This button allows you to save setup parameters for all stock files.
See Also : Stock Main Menu , List Parts , Hot keys , Add Stock , Import Stock , Print Barcode , Part Build