BIZZ WIZZ POINT
OF SALE
SETUPS
Bizz Wizz : Setup , Main Menu , Ledger , Phone Book , Invoice Book , Stock Book , Order Book , Creditors , Point of Sale , Business Name , Diary , Wages , Document Manager , Unlock , Backup
See Also : POS Scan Main Screen , POS Setup , POS Scan , POS Find Part , POS Edit , POS Hot Keys , POS Archives , POS Sales List , POS Hold , POS List Invoices , POS Finalize , POS Invoice Pay , POS Staff , POS Customer
Point of Sale Setups:
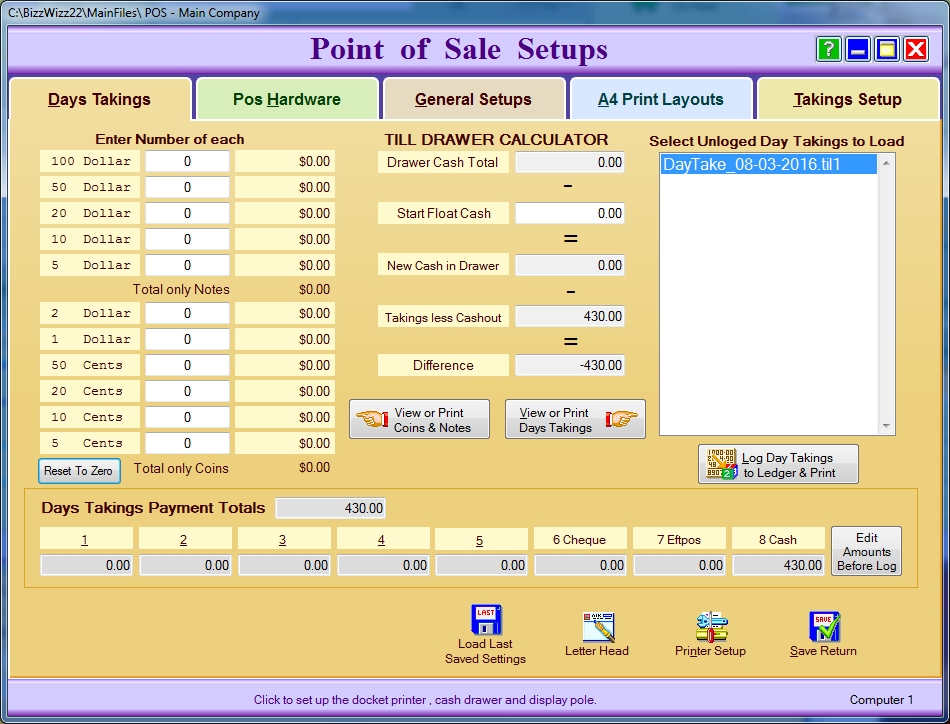
Days Takings:
Till Drawer Calculator
To Add The Till Drawer. To get or add up the days cash total you must click one of
days un-logged Takings files in the right hand File List first. This selects the
day you which to work on. Now enter the number Notes and Coins in the left
hand boxes. The Start Float can also be entered and saved you can also
save it as a default amount. To print this report of the till drawer
totals ' Click the View or Print Coins & Notes ' button.
Days Takings Report:
The when the banking is done click one of days un-logged Takings files
in the right hand File List first. This selects the day you which to work on.
You can change the total amounts of the money to send to the ledger with the
'Edit Amounts Before Log ' button
View or Print Days Takings Button: Click on this button to either
view or print or email the report. Note: this button will Not log to
ledger!
Log Days Takings to Ledger & Print Button: Click on this
button to log the days takings to the Ledger and also
view or print or email the report.
When selecting the 2 above buttons To
Print or View or Email the Report.
You will then be asked if you
wish to Print all transactions or just totals. Press YES for if you whish
to see all transactions listed or No for
just totals.
You will then be asked to Print to the Docket Printer or to the A4
printer. Press YES if
you want to print to the docket printer or No if you then wish to print to A4
or view or email.
With the Log Button You will also be asked to send Days Taking to the Ledger and
delete file. If you press OK the day will finalize and the log will be deleted.
After this you May Be asked if you wish to send all further transactions
to the next days taking file. This can be useful if you wish the end up the day,
but more customer come in after the days done.
Edit takings amounts Before Log Button: Log Totals can be changes, When
the totals are changed the log file will receive another Transaction to reflect
the change.
Bottom Buttons
Load Last Saved Settings: Click on this box
ONLY if you want to load the last settings that you saved (not the
settings you have just done as those settings are saved by clicking on
Save/Return button).
Letter Head: Click to load the designer Program.
Printer Setup: Click on this button to change Windows printer setup.
Please refer to Windows Help for further information.
Save Return: Click on this button to save the settings for A4 Print
Layouts and to return to the main screen.
Pos Hardware:
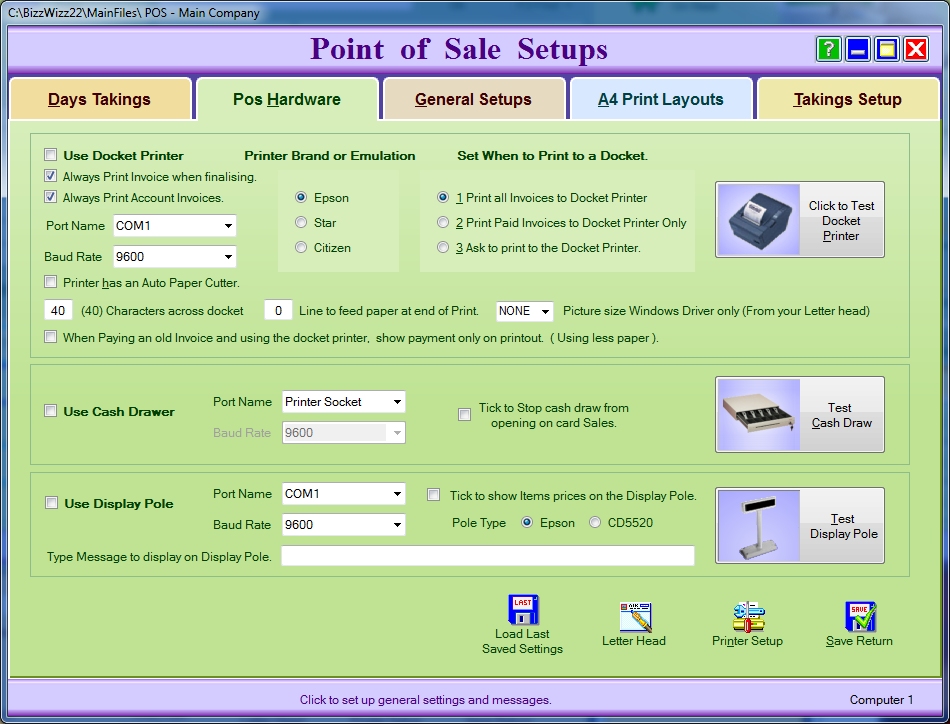
Use Docket Printer: Tick this box if you always want to use the
Docket Printer.
Printer Brand or Emulation - Epson / Star / Citizen: Tick the
box for the appropriate printer brand or emulation.
Always Print Invoice when finalizing: Tick this box if you always want
an invoice printed when it is finalized.
Always Print Account Invoices: Tick this box if you always want an
Invoice printed if there is money owing on the Invoice.
For help on port and baud rate ask your hardware supplier or Bizz Wizz.
Port Name: Click on this box and select the appropriate Port
Name.
Baud Rate: Click on this box and select the appropriate Baud
Rate.
Printer has an Auto Paper Cutter: Tick this box if the printer has an
automatic paper cutter and you want to use it.
(40) Characters across docket: This box will set the number of
characters you wish print across the docket. (40 , 35 , 33) depending on the
width of the paper.
Line to feed paper at end of Print: This box will set the number of
lines to feed the paper out of the printer at the end of the print.
Picture size Windows Driver only (From your Letterhead): Click on this
window to select the picture size windows driver you require. This is
taken from your letterhead.
When Paying an old Invoice and using the docket printer, show payment on
printout. Tick this box to stop the printing of items on a docket if
the docket is a reprint for paying or part paying an old invoice.
Only the payment will be printed on the docket.
Set When to Print to a Docket:
1 Print all Invoices to Docket printer: Tick this box if you want all
Invoices to be sent to the Docket Printer.
2 Print Paid Invoices to Docket Printer Only: Tick this box if you
only want paid invoices to be sent to the Docket Printer the rest will go to the
A4 printer.
3 Ask to print to the Docket Printer: Tick this box to always ask to
print to the docket printer or to A4 printer.
Click to Test Docket Printer: Click on this button to test what
you have set on the Docket Printer.
----------------------------------------------------------------------------------------------------------------------------------------------
Use Cash Draw: Tick this box if you want to use the Cash Draw.
For help on port and baud rate ask your hardware supplier or Bizz Wizz.
Port Name: Click on this window and select the appropriate Port
Name.
Baud Rate: Click on this window and select the appropriate Baud
Rate.
Stop cash draw from opening on card Sales: Tick this box if you
want to stop the cash draw from opening when you do a card sale.
Test Cash Draw: Click on this button to test the settings for
the Cash Draw.
----------------------------------------------------------------------------------------------------------------------------------------------
Use Display Pole: Tick this box is you wish to use the Display Pole.
For help on port and baud rate ask your hardware supplier or Bizz Wizz.
Port Name: Click on this window to select the appropriate Port Name.
Baud Rate: Click on this window to select the appropriate Baud
Rate.
Show Items prices on the Display Pole: Tick this box if you wish to
show the items/parts prices flash up on the Display Pole for a few seconds .
Pole Type - Epson / CD5520: Tick the
appropriate box for your Pole Type. CD5520 is default
Type message to display on Display Pole: Use this box to type
any message you wish to display on the Display Pole.
Test Display Pole: Click on this button to test what you
have set up on the Display Pole.
----------------------------------------------------------------------------------------------------------------------------------------------
Load Last Saved Settings: Click on this box
ONLY if you want to load the last settings that you saved (not the
settings you have just done as those settings are saved by clicking on
Save/Return button).
Letter Head:
Printer Setup: Click on this button to change Windows printer
setup. Please refer to Windows Help for further information.
Save Return: Click on this button to save your settings for the POS
hardware and to return to the main screen.
General Setups:
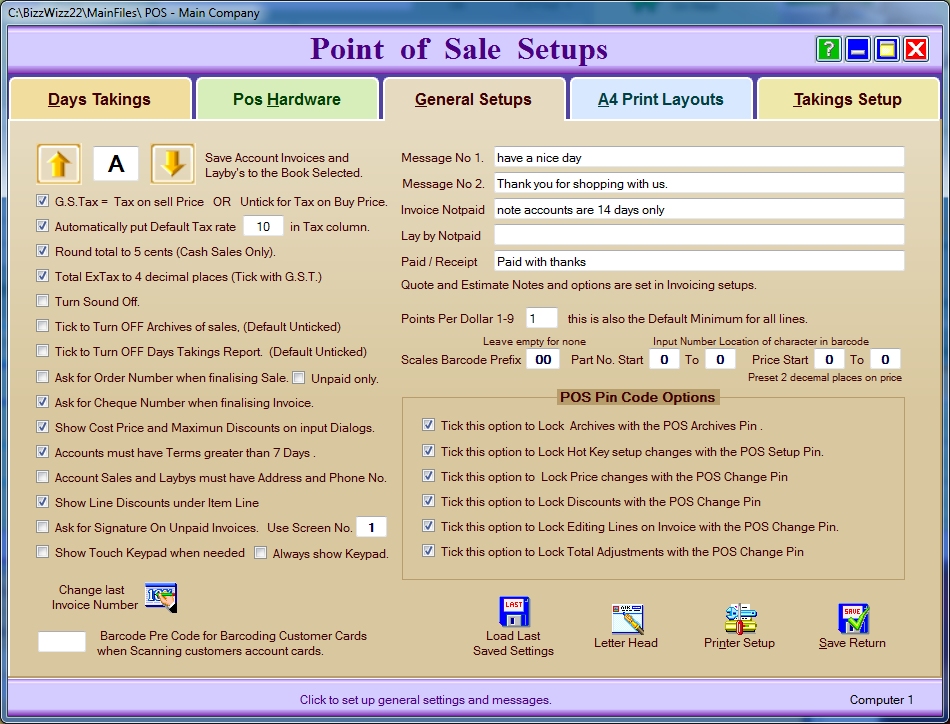
Save Account Invoices and Laybys to the Book Selected: Click on
either the up or down arrow to go to a prefix book letter to store invoices
under this prefix Eg. A as in A123 as the invoice number.
G.S.Tax = Tax on sell Price OR Untick for Tax
on Buy Price: Tick this box to show GST = tax on the sell price or
untick for sales tax on buy price.
Automatically put Default Tax rate: Tick this box if you want the
Default Tax rate to be entered Automatically and then put a (eg 10) of tax in the next box so that it will then be
entered in the Tax column.
Round total to 5 cents: Tick this box if you require the total
amount of the invoice to be rounded to the nearest 5 cents.
Total ExTax to 4 decimal places (Tick with G.S.T.): Tick this
box if you want to rounded unit prices to 4 decimal places (this box
needs to be ticked if you have ticked the GST box).
Turn Sound Off: Tick this box if you do not want to hear the sound.
Tick to turn off Archives: (Default is unticked)
Tick to turn off Days Taking: (Default is unticked)
Ask for Order Number when finalising Invoice: Tick this box if you
require an Order Number to finalise the Invoice.
Unpaid only :This tick box is used to only ask for the Order number if the
invoice is unpaid
Ask for Cheque Number when finalizing Invoice: Tick this box if you
require a Cheque Number to finalise the Invoice.
Show Cost Price and Maximum Discounts on input Dialogs:
Accounts must have Terms greater than 7 Days: Tick this box if the
Accounts must have Terms greater than 7 Days. ( Customer must pay if they
do not have terms more than 7 days)
Message No 1/No 2: These boxes will allow you to print up to 2
messages on the Invoices.
Invoice Not Paid: This box will allow you to print a message if the
Invoice has not been paid.
Layby Not Paid: This box will allow you to print a message if the Layby has not been paid.
Paid/Receipt: This box will allow you to print a message on an
Invoice that has been paid.
Points Per Dollar 1 - 9 : Enter the amount of point per dollar this is
also the
Default Minimum for all lines with a value but not selected from stock
files.
Change last Invoice Number: Click on this box and another box will
come up in which you can change the Invoice number.
'Change Pin' Lock options: When ticked these 5 options will need the
Change Pin to let the user into these areas
Pre Code for Customer cards: When a customer card Barcode is scanned
the software needs a trigger to let it know that it is a card that has been
scanned this is done by a Pre Code EG: 'XXX' then after the code will be the
account Number '000250' for account 250. So the full barcode would be XXX000250.
The Pre Code can be what you like but must be the same on all cards.
Archive Options
Archives of Sales: Tick this option to turn on Archive sales so you
can recall any sale even if it has not been sent to Invoicing.
'Change Pin' Lock Archives of Sales: Tick this box if you need to lock Archives of Sales
With the 'change pin' .
Load Last Saved Settings: Click on this box
ONLY if you want to load the last settings that you saved (not the
settings you have just done as those settings are saved by clicking on
Save/Return button).
Letter Head: Click to load the designer Program.
Printer Setup: Click on this button to change Windows printer setup.
Please refer to Windows Help for further information.
Save Return: Click on this button to save your settings for General
Setups and to return to the main screen.
A4 Print Layouts:
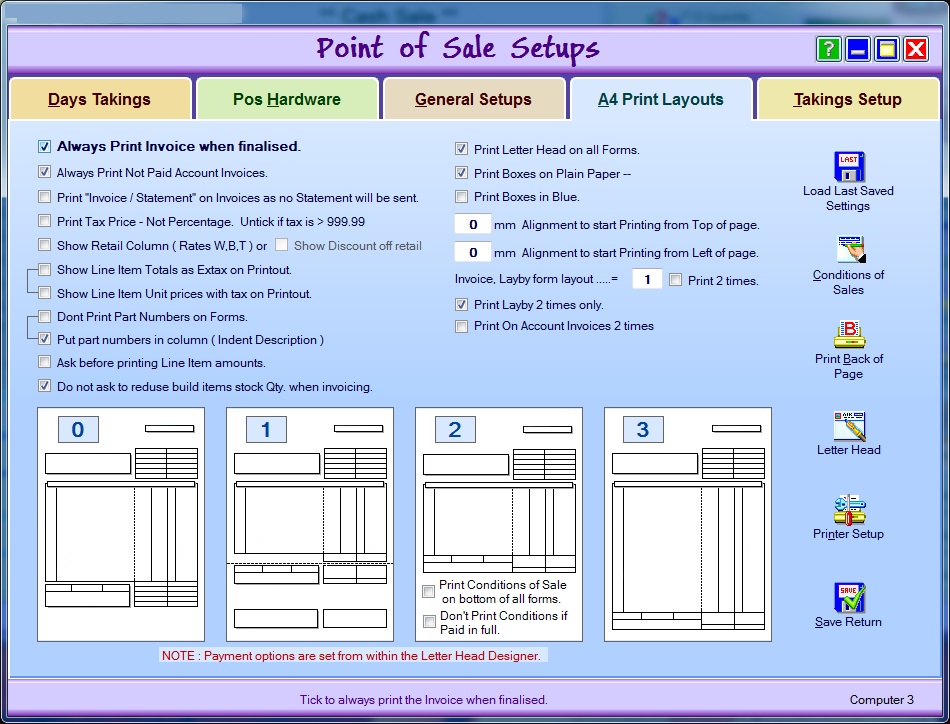
Always Print Invoice when finalized: Tick this box if you always want
the Invoice to be printed when it is finalised.
Always Print Account Invoices: Tick this box if you always want an
Invoice printed if there is money owing on the Invoice.
Print "Invoice/Statement" on Invoices as no Statement will be sent: Tick
this box if you want your Invoice to also say Statement.
Print Tax Price - Not Percentage. Un-tick if tax is >999.99: Tick this box if
you wish to show the amount of tax not just the percent. If your tax has a value
of more than 999.99 then don't use as the amount will not fit in the column.
Show Retail on forms with Rate (Wholesale, Bulk & Trade): Tick
this box if your customer resells and needs to know the retail price.
Show Line Item Totals as Ex-tax on Printout: Tick this box if you need
the item totals to be ex-tax on the invoice printouts.
or
Show Line Item Unit Prices With Tax on Printout: Ticking this box will
show all prices with tax.
Don't Print Part Numbers on Forms: Tick this box if you do not require
the Part Numbers to be printed on invoice forms.
Put part numbers in column (Indent Description): Tick this box if you
want to put part number in columns.
Ask before printing Line Item amounts: Tick this box if you some times
do not print a price brake down of the items on the invoice.
Print Letter Head on all Forms: Tick this box if you want your
Letter Head to be printed on all Sales invoices.
Print Boxes on Plain Paper: Tick this box if you want
boxes printed on plain paper.
Print Boxes in Blue: Tick this box if you want boxes printed in
blue on the paper.
mm Alignment to start Printing from Top of page: In this box put the number
of mm (eg 2mm) that you wish to start printing from the top of the page.
mm Alignment to start Printing from Left of page: In this box put the
number of mm (eg 2mm) that you wish to start printing from the left of the
page.
Invoice, Layby form layout: Put the number in this box (eg 2) which
corresponds to the
layout below of the invoice/layby you wish to print.
0 = this is to print an invoice for a limited number of items.
1 = this is to an invoice that has a tear off piece at the bottom of the
invoice.
2 = this is to print an invoice that allows space for messages and
also for conditions of sale. 3 = this will print an invoice
for a large number of items.
Print 2 times: Tick this box if you want to print 2 copies of the
invoice.
Print Laybys 2 times only: Tick this box if you only want the
laybys printed 2 times.
Print On Account Invoices 2 times: Tick this box if you only want the
not paid Invoices and laybys printed 2 times.
Conditions of Sales: This button will allow you to set conditions
of sale relating to those parts/items sold.
Print Back of Page: This button will allow you to print payment
details as well as conditions of sale on the back of the invoice..
Bottom Buttons
Load Last Saved Settings: Click on this box
ONLY if you want to load the last settings that you saved (not the
settings you have just done as those settings are saved by clicking on
Save/Return button).
Letter Head: Click to load the designer Program.
Printer Setup: Click on this button to change Windows printer setup.
Please refer to Windows Help for further information.
Save Return: Click on this button to save the settings for A4 Print
Layouts and to return to the main screen.
Takings Setup
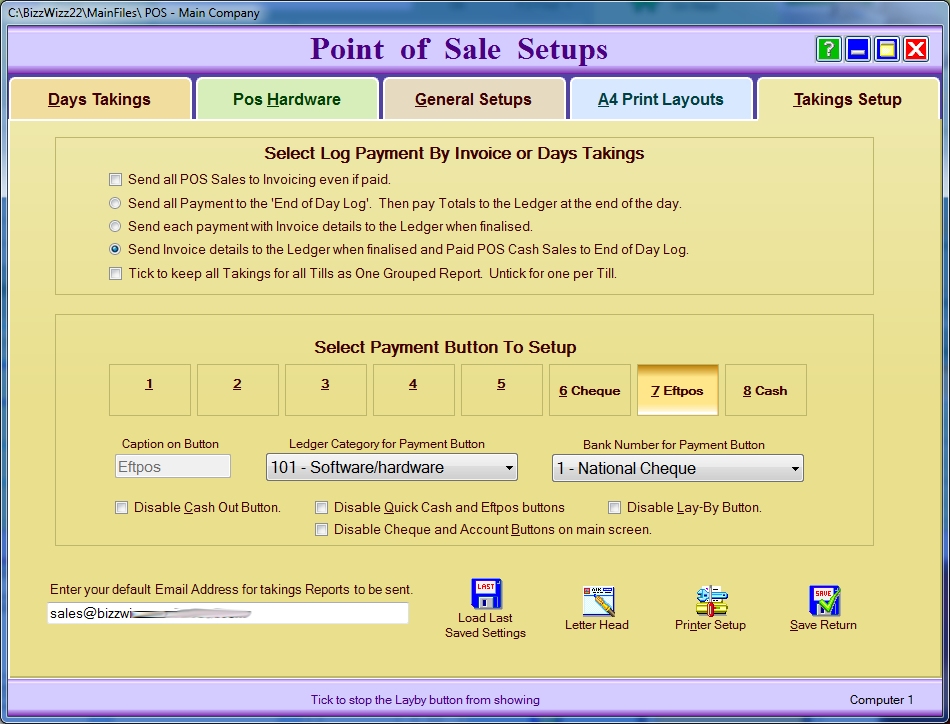
Select Log Payment By Invoice or Days Takings:
Send all POS Sales to Invoicing even if paid: Tick this box if you want all
POS sales to be sent to Invoicing even if they have been paid.
Send all Payments to the 'End of Day Log'. Then pay Totals to the Ledger
at the end of the day: Tick this box if you want all payments to be
sent to the 'End of Day Log' and then want the Totals paid to the Ledger at the end of the day.
Send ALL payment with its Invoice details to the ledger when finalized: Tick this box if
you want to send each payment, with the relevant invoice details, to the Ledger
when the sale is finalised.
Send Invoice details to the Ledger when finalized and Paid POS Sales to End of
Day Log: Tick this box if you want Invoices stored in invoicing sent
with details
to the Ledger when finalized and paid POS Sales only to the End of Day Log.
Tick to Keep all takings for all Tills as One Grouped report : Ticking this
box makes all sales go to the one days Taking report report
Select Payment Button to Setup:
Caption on Button: Click on this box to enter a caption/name
on each of the eight (8) payment buttons.
Ledger Category for Payment Button: Click on the arrow to select the
Ledger Category for each Payment Button. A window will drop
down giving you all the ledger categories. Highlight the category you want
then click on that category to enter it into the white box.
Bank Number for Payment Button: Click on the arrow to select the
Bank Number for each Payment Button. A window will drop down
giving you all the bank numbers. Highlight the bank number you want then
click on the number to enter it into the white box.
EMAIL ADDRESS:
If you wish to email the end of day takings enter the email address to send
the report to.
Bottom Buttons
Load Last Saved Settings: Click on this box
ONLY if you want to load the last settings that you saved (not the
settings you have just done as those settings are saved by clicking on
Save/Return button).
Letter Head: Click to load the designer Program.
Printer Setup: Click on this button to change Windows printer setup.
Please refer to Windows Help for further information.
Save Return: Click on this button to save the settings for A4 Print
Layouts and to return to the main screen.
See Also : POS Scan Main Screen , POS Setup , POS Scan , POS Find Part , POS Edit , POS Hot Keys , POS Archives , POS Sales List , POS Hold , POS List Invoices , POS Finalize , POS Invoice Pay , POS Staff , POS Customer