Show Parts list
Bizz Wizz : Setup , Main Menu , Ledger , Phone Book , Invoice Book , Stock Book , Order Book , Creditors , Point of Sale , Business Name , Diary , Wages , Document Manager , Unlock , Backup
See Also : Stock Main Menu , List Parts , Hot keys , Add Stock , Import Stock , Print Barcode , Part Build
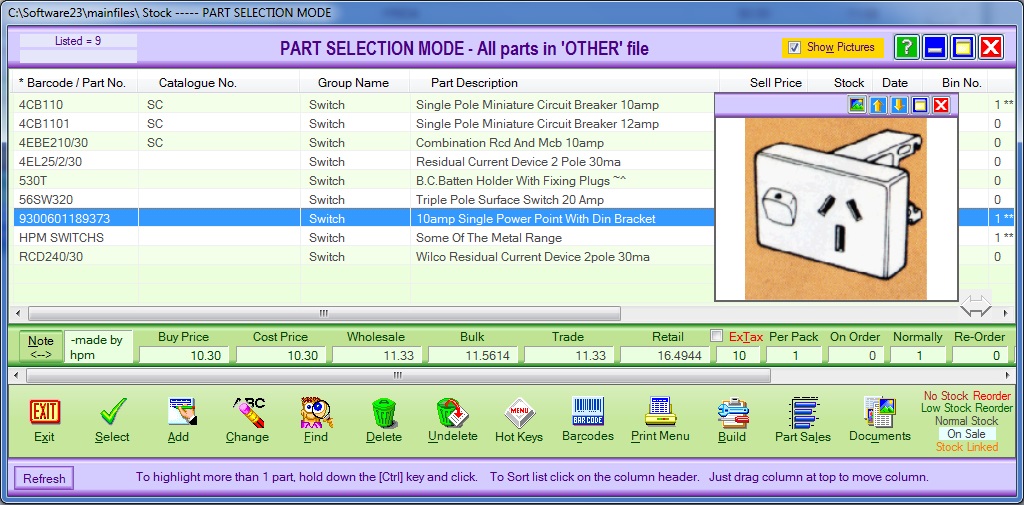
Allows you to show a list of stock items and to add or edit a stock item
All parts within the file will be viewed on the screen. If there are more
than one page of items within the file, you can scroll down through the list.
This can be done by pressing the down arrow key on the key board or clicking on
the down arrow in the scroll bar on the right hand side of the list of parts.
You can also page down or up through the list using the [PAGE DOWN] and
[PAGE UP] keys. If you wish to go to the end or the beginning of the file
press [END] or [HOME].
Directly under the list, you will see a row of boxes with a light background.
The first box will say Note, the second box will say
Cost Price, and so-on.
These boxes hold information about the record that is highlighted. So to view
the amount of tax on a given part, highlight the part first and the percentage
of tax will be displayed.
Helpful Tip: These boxes can also be used to change the amounts in the
field for that box on one or more highlighted transactions.
Red Prices:
If the totals at the bottom are in red, then the prices are tax exempt.
NOTE BUTTON - You will notice the box has a button. By clicking the [NOTE] button, the box will increase in size.
This has two uses:
1.
To see the note text for this part in more detail.
2.
To hide the prices behind, if someone is viewing the screen. This stops them
from seeing the cost price, wholesale price, bulk price and trade price.
The buttons across the bottom of the part selection mode menu are:
EXIT BUTTON - This exits back to the main menu.
SELECT BUTTON - You use this button when you are selecting a part to go into invoicing or ordering by highlighting the stock item.
ADD BUTTON - This will add a new record to the file. Please refer to Adding New Data
CHANGE BUTTON -
This will allow you to change some facets of that record. By clicking on the
[CHANGE] button it will bring up the
Change Part Section box to allow you to edit the item.
This can also be done by Right Clicking on the item in the list.
FIND BUTTON -
This is used to find a particular sub-group of parts. Find will search on part
number, description, catalogue number, group name and notes.
Please refer to the
Find Data Section.
DELETE BUTTON - Highlight the record you wish to delete then click on the [DELETE] button and the selected part will disappear.
UNDELETE BUTTON - If you have deleted a part, it can be undeleted but pressing the [UNDELETE] button.
HOT KEYS BUTTON - Shows and Hides when clicked. To set up see Hot keys
BARCODES BUTTON - This allows you to print bar codes for particular parts. Please refer to the Bar Code Section.
PRINT MENU BUTTON - This allows you to print stock list, stock value, total value, markup stats, prices and notes, re-order list, stock difference, sales reports and retail reports. Please refer to the Print Menu Section.
BUILD BUTTON - To create one stock item out of several parts. i.e.. Wheels, engine, car body = new car. Please refer to the Build Section.
PART SALES - This button allows you to view, print or export sales report for the highlighted part.
DOCUMENTS - This button allows you to view, add external documents, add web address. Please refer to the documents section.
On the bottom Right Hand Side:
No STOCK - In light red, means you have no stock.
REORDER - In brighter red, means you need to reorder.
LOW STOCK REORDER - In green, means your stock is lower than what is programmed in the normally held box for that particular stock item.
ON SALE - Black on white, means that particular stock item is on sale.
STOCK LINKED - In amber, means that particular stock item is linked to another stock item. Please refer to the Adding New Data section.
Click on [FIND] button. (Located on the bottom row of List Screen) .
Once clicked you will see the following menu
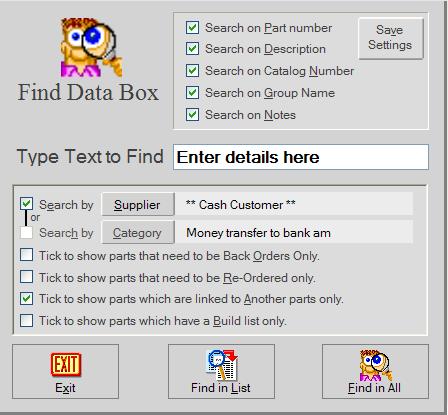
If it is the first time using this feature, we will have to set it up.
On the top right hand side click the appropriate check box, once selected click on [SAVE SETTINGS] button.
On the bottom left hand side click on [SUPPLIER] button and your suppliers menu will come up then select the appropriate supplier then click on [OK] button.
On the bottom left hand side click [CATEGORY] button.
NB: Only select one [SUPPLIER] or [CATEGORY] button.
Your categories will come up (which is from your category list in the ledger) select the appropriate category then click the [OK] button.
PLEASE NOTE: You should have different categories relating
to stock sales than those used for your normal income categories in the ledger.
Your income maybe under the category of INVOICES which is just recording
the income received and not breaking your income up, which makes it easier to
reconcile in the ledger. Sales categories break your income up into the
appropriate categories i.e.. Beer Sales, Wine Sales and Sundries
If you have not already setup these categories then do so in the ledger before
you continue.
HINT: Put your income categories at the beginning of the list and the sales categories at the bottom of the list.
On the bottom left hand side click the appropriate check box (Only select one) then click [FIND IN LIST] or [FIND IN ALL] button for your find result.
Click on [EXIT FIND] button to exit then you are back to the original screen, click the [EXIT] button to exit the show parts and add or edit menu.
See Also : Stock Main Menu , List Parts, Add Stock , Import Stock , Print Barcode , Part Build
Allows you to print selected parts in a list, stock value, total value, markup stats, prices and notes, re-order list, stock difference, sales reports and retail reports.
NOTE: By moving the mouse over the buttons, the help box at the bottom of that screen will give you a brief description of the function of that button.
Click the [PRINT] button. (Located on the bottom row of buttons).
PRINT LIST - Click to print selected parts in a list.
STOCK VALUE - Click to print selected parts in a list with their stock
values.
TOTAL VALUE - Click to print selected parts as a total value.
MARKUP STATS - Click to print selected parts in a list show markup
profit.
PRICES & NOTE - Click to print selected parts in a list with there
notes.
RE-ORDER LIST - Click to print selected parts in a list if they need to
be recorded.
STOCK DIFFERENCE - Click to print selected parts in a list show stock
before the last reset and the current stock values.
SALES REPORTS BUTTONS
Click on the option check box(s) and set the type of printout you need
first
CATEGORY SALES - Click to print selected parts in a
graph showing sales by category for all months and up to the last 3 years.
SALES ALL LISTED - Click to print selected parts in a graph showing for
all months and up to the last 3 years.
MONTH SALES SPREAD - Click to print selected parts showing sales as a
spreadsheet.
DEAD STOCK LIST - Click to print selected parts in a list showing sales
by category for options selected.
SALES LIST - Click to print selected parts in a list showing sales for
options selected.
GP CATEGORY SALES TOTAL - Click to print selected parts in a list
showing sales by category for options selected.
RETAIL REPORTS BUTTONS
Click on the option check box(s) and set the type of printout you need
first
PRINT PART DETAILS - Click to print one selected part
detail and picture as per the options to the right.
CLIENT PRICE LIST - Click to print selected parts in a client price
list as per the options to the right.
START A NEW STOCK FILE - This button allows you to start a new stock file now click on [START A NEW STOCK FILE] button and type in a new stock file name then click on [OK] button. Now a setup file screen will come up fill in the screen. Refer to Stock Menu Maintenance Section.
See Also : Stock Main Menu , List Parts , Hot keys , Add Stock , Import Stock , Print Barcode , Part Build