BIZZ WIZZ POINT
OF SALE
MAIN SCAN MENU
Bizz Wizz : Setup , Main Menu , Ledger , Phone Book , Invoice Book , Stock Book , Order Book , Creditors , Point of Sale , Business Name , Diary , Wages , Document Manager , Unlock , Backup
See Also : POS Scan Main Screen , POS Setup , POS Scan , POS Find Part , POS Edit , POS Hot Keys , POS Archives , POS Sales List , POS Hold , POS List Invoices , POS Finalise , POS Invoice Pay , POS Staff , POS Customer
NOTE: By moving the mouse over the buttons, the help box at the bottom of that screen will give you a brief description of the function of that button.
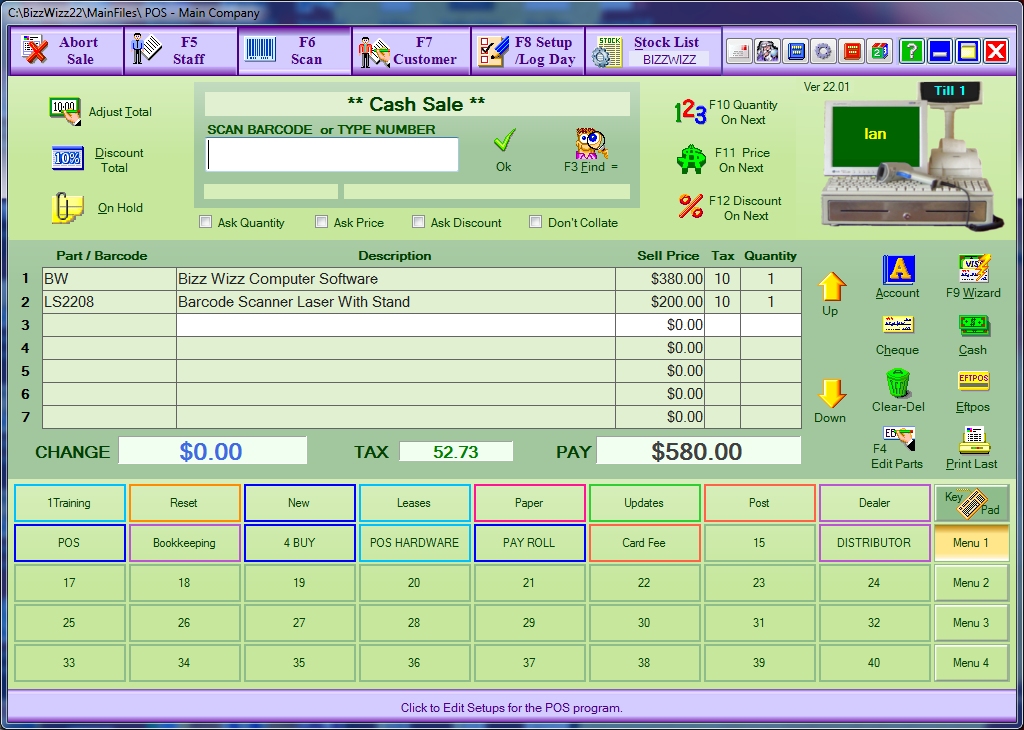
The picture below is the main screen for point of sale.
There are 7 tabs:
Abort Sale - This will abort the Sale if one has been started. NOTE
The customer name will also be reset to 'Cash Sale'
Staff F5 - This tab will bring up the Sales Person
selection screen,
Scan F6 - This tab shows the main screen as shown
below. This screen is primarily used for barcode scanning of
stock and previewing Sale content.
Customer F7- This tab will bring up the
screen to enter or select the Customer Details.
Setup F8 - This tab will bring up the screen
to setup all your requirements for point of sale.
Finalise F9- This tab will bring up the screen to finalise the
transaction. NOTE If a Sale has a 0 balance the Finalise will not
work.
Stock List- This tab will show a drop down file list to select the
correct stock file required for part selection.
How to Add New Stock click the Stock button under
the picture of the till on the right side of the screen.
These buttons can also be accessed using the function keys on your keyboard eg F5 will select the staff screen.
Scanning barcodes: To scan a barcode make sure
that the cursor is flashing in the white box under Scan Barcode or Type Number .
Numbers can also be typed in. Note If a number is not found check
the Price file that contains this part is selected at the top right of the
screen.
OK Button: Click on this button once part/item number has been entered.
Ok Will also select a part if only part of the number is typed in and the
correct part has been found below the white input box. Note If you press
Enter and only part of the number has been entered, the part will be rejected
but if you pressed the ok button the part will be selected. This is because
'Enter' checks barcode as being the same or not.
Find Button: Click on this button to find the part/item number you require.
Scan Options
Ask Quantity: Tick this box to enter
the quantity of an item. If un-ticked a quantity of one is auto
selected unless a quantity option has been selected else ware.
Ask Price: Tick this box to remind staff to enter the
price of an item. If the price is in the box and is correct
just press 'Enter' or 'Ok' to continue.
Ask Discount: Tick this box to remind staff to enter a
discount if one is given. Just leave the box blank if no
discount is given and press 'Enter' or 'Ok' to continue
OR type 10 for 10% discount or -10 to
add to the price.
Don't Collate: Tick this box for every Item to be entered
separately on the invoice. If this box is not ticked you will get
the
Quantity increased if the same part is scanned.
Adjust Total Button: Click on this button to adjust the total of
the invoice. You can then input a new total with tax.
Discount Total Button: Click on this button to discount the
total of the invoice. You can then enter the percent discount on
the total.
On Hold Button: Click on this button to put
a Sale on hold or retrieve a Sale from hold.
Quantity On Next Button: Click on this button to enter the
quantity on the next part selected.
Price On Next Button: Click on this button to enter or check the price
of a part on the next part selected.
Discount On Next Button: Click on this button to enter the a
discount of a part on the next part selected.
Up/Down Button: Click on these buttons to select the next line in the
items soled list. Hold down the button to scroll up or down the list.
Clear/Delete Button: Click on this button to clear or delete a line of text.
Press once to clear a line of text or press twice to completely delete
the line if it is blank.
Edit Parts Button: Click on this button to edit or change the
information on any part/item detailed on the invoice.
Stock: Click on this button to go to the Stock
Control Program.
Invoice/Layby Button: Click on this button
to View or Pay or even part pay Invoices and Layby's stored in the
Invoicing section of BW.
Archives Button: Click on this button to go to the archives for
the history of all sales made and all parts/items sold.
Print Last Button: Click on this button to print a copy of the last Sale or Invoice
paid or part paid.
Along the bottom of the main Screen :
Can have Hot Keys or Touch screen key
Board. Hot keys can be setup to Select a part or List,
Find, Refine Part lists
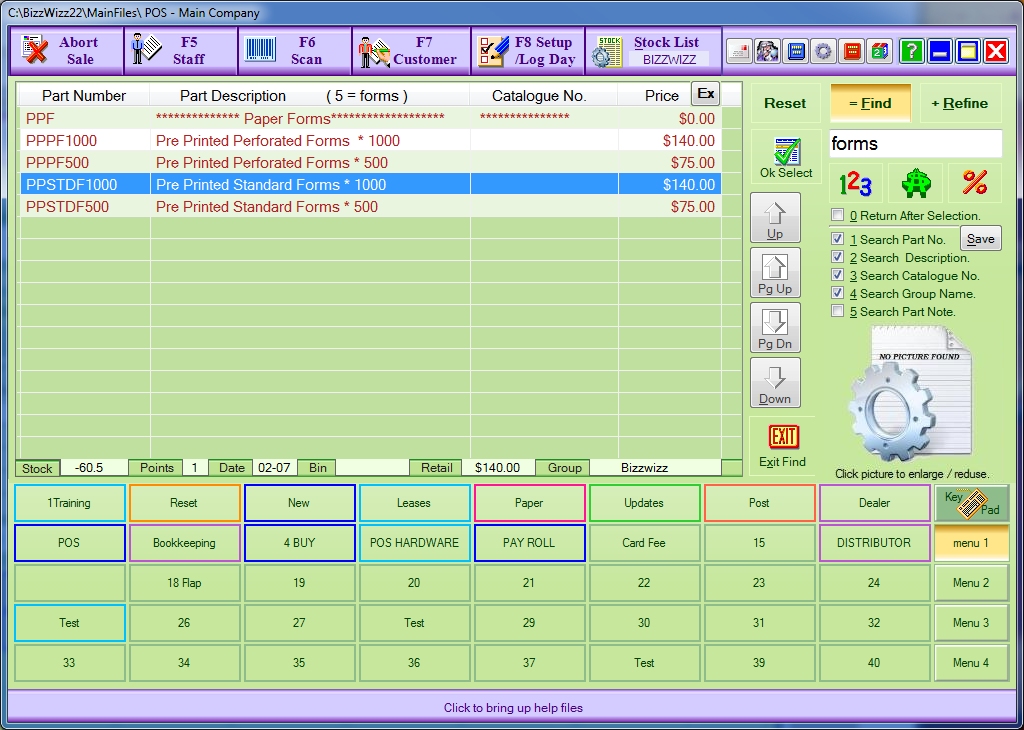
= Find Button: When you click on this button it allow you to search for a part. When the screen first opens the cursor should be flashing in the white box. Type in the part you want to find (eg Post) then click on the = Find button or type '=' or press 'enter', this will bring up that part or a list of parts with the word 'Post' in that parts record. The find mode can also be selected by pressing '=' before or after the text you wish to find. In find mode the full stock file is searched.
+ Refine Button: If you wish to find a particular part in
the group listed (eg
Red postage bags) type in (+Red) then press the + (plus) or Refine button.
This will then Search for all parts with the word 'red' in the already listed
items in the list only.
NOTE: To select a item in the list! Double click on the part
OR press the Down Arrow which selects the list then arrow to the part and
press Enter.
If using a touch screen press 'Ok Select button'.
Ok Select Button : When selecting a part to put on the Invoice press this
button to ok the selection.
Up/Down: Click on these buttons to move the cursor up and down
the stock list.
Pg Up/Pg Dn: Click on these buttons to move the cursor up a page
or down a page.
Exit Button: Click on this button to exit the find screen and
return to the main screen.
The 123 Button : Is for Quantity on
next, When ticked and a part is selected the Quantity will be asked for only
on the next part.
The $ Button : Is for Price on next,
When ticked and a part is selected the Price will be asked for only on the next
part.
The % Button : Is for
Discount on next, When ticked and a part is selected a Discount will be
asked for only on the next part.
OPTIONS
Return After Selection: Tick this box to automatically return to Scan
mode screen after the selection of the part.
Search Description: Tick this box to search by
description of the part.
Search Catalogue No: Tick this box to search by the
Catalogue No of the part.
Search Group Name: Tick this box to search by the
Group Name of the part.
Search Part Note: Tick this box to search by Part Note.
Save Button: Click on this button when you have made your search
selections and wish to save them.
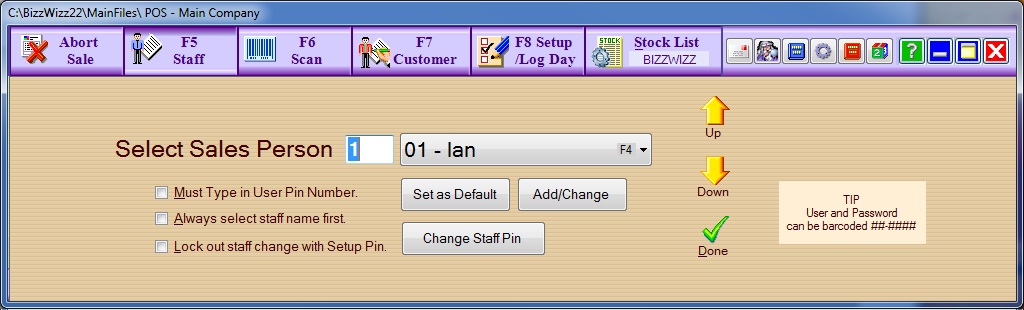
Note: If this screen appears at the beginning of a transaction then
the following option has been selected.
Always select staff name first: Tick this Check box if you require your
sales persons' name to be selected before each sale..
Lock this section with change pin: By ticking this Check box this section
can also locked, if need be, but you will then need to set up the change pin number
so it can be used.
Select A Sales Person: You can select a sales person by using
either the drop down box (F4 to drop) or the up and down arrows.
Set as a default: A particular staff member can be selected as the
default by highlighting their name and then pressing the set as default
button.
Add/Change: To add/change a name, select the position within
the list then press the add/change button and a box will open. Add or
change the name and then press OK.
Done: Click on this button when finished and you will return to the main
scan screen.
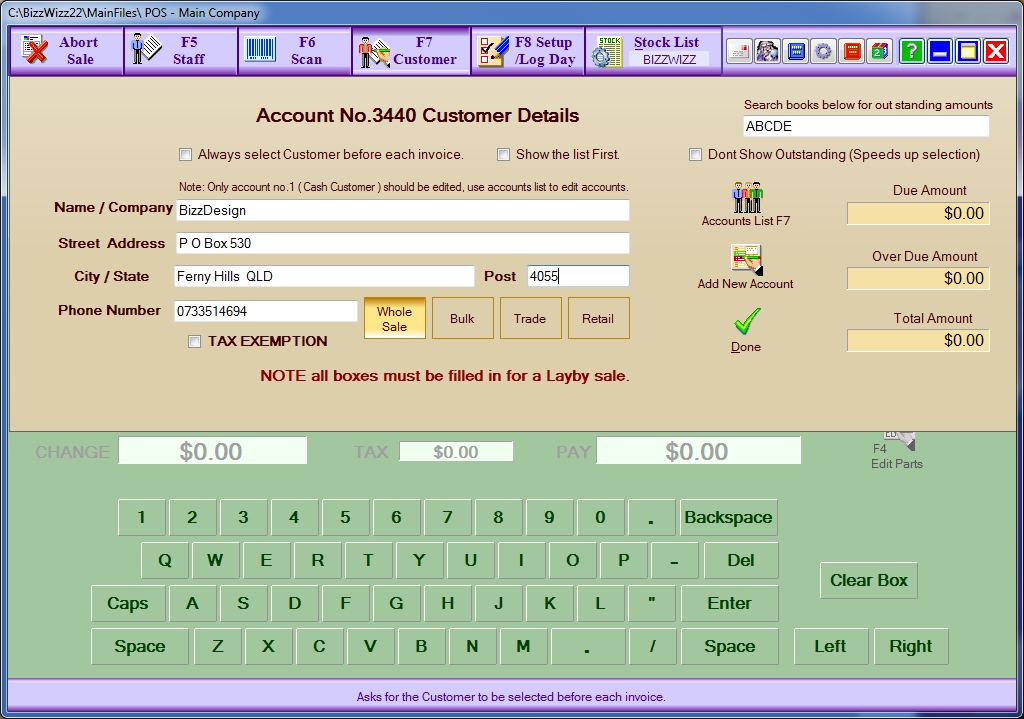
Note: If this screen appears at the beginning of a
transaction then the following has been selected.
Always select Customer before each invoice: Tick this box if
you require the customer to be selected or entered before an Invoice is started.
And Show the list: Tick this box for the customer list to
come up automatically without having to press the Accounts List button..
Accounts List: Click on this button to bring up your current list
of customers.
Add New Account: Click on this button to bring up the screen to add a new
customer account to the Accounts List.
Wholesale/Bulk/Trade/Retail: Click on these buttons to set the
price/discount applicable to this customer. Normally set automatically
from customer list but can be changed at point of sale transaction if necessary
or required.
Tax Exemption: Tick this button if tax exemption is
applicable.
Done: Click on this button when customer details have been entered
and you will return to the main screen.
Please note: The green on screen keyboard can be used with touch screen
monitors in replacement of the keyboard.

Edit Parts: Click on this button to edit or change the
information on parts/items detailed on the invoice.
Up/Down: Click on these buttons to move the arrows either up or
down a line on the invoice.
Clear/Delete: Click on this button to clear a line of text.
Press once to clear a line of text or press twice to completely delete
the line.
Done: Click on this button when you have finished editing and you will
return to the main screen.
Please note: This screen will also come up if you click anywhere on
the invoice lines.
See Also : POS Scan Main Screen , POS Setup , POS Scan , POS Find Part , POS Edit , POS Hot Keys , POS Archives , POS Sales List , POS Hold , POS List Invoices , POS Finalize , POS Invoice Pay , POS Staff , POS Customer