BIZZ WIZZ INVOICING
MAIN MENU
Bizz Wizz : Setup , Main Menu , Ledger , Phone Book , Invoice Book , Stock Book , Order Book , Creditors , Point of Sale , Business Name , Diary , Wages , Document Manager , Unlock , Backup, Memo
See Also : Invoice Main Menu , Invoice List , Customer List , Add and Edit Customers , Sales History , View / Edit Invoice , Age Statements , Pay Invoice , Job Schedule , Service Module , POS Setups , Hot Key Setups
NOTE: By moving the mouse over the buttons, the help box at the bottom of that screen will give you a brief description of the function of that button.
Invoices can be saved in books of 9999 Invoices or less per setups. Invoices books Prefixs are A
to Z, this letter is only used to give the book a reference Prefix
and is NOT the first letter of a name. Books 1 to 9 are used
for repetitive Invoicing only. Eg.( Same Invoice each month )
Invoices can be Tagged as Quote, Estimate, Job card, Backorder, Hire,
Layby and Invoice.
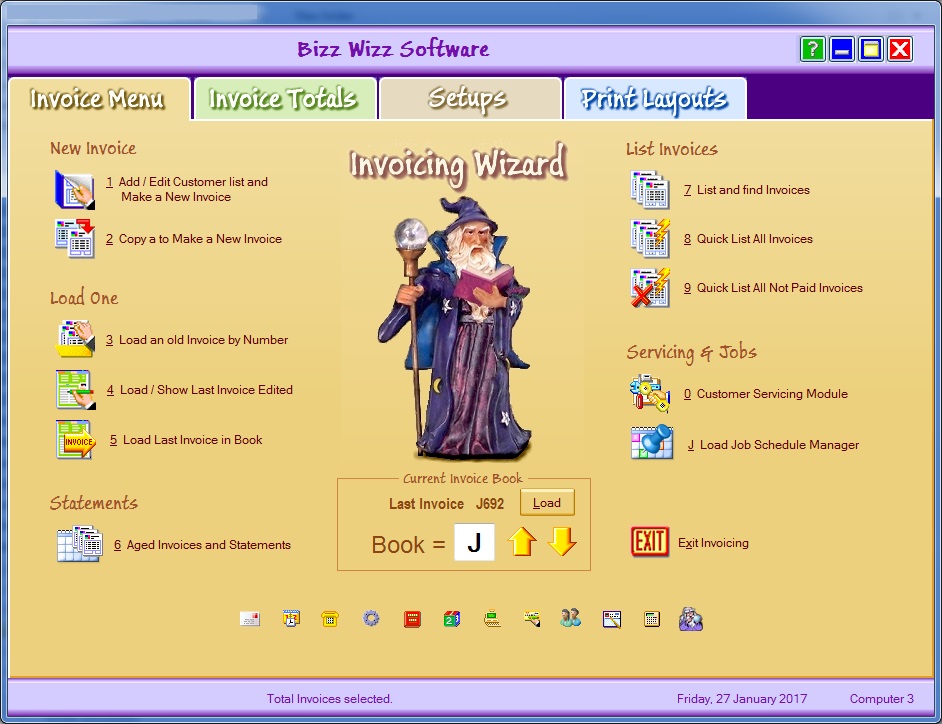
INVOICE MENU TAB
1 Make a New Invoice Or Edit Customer List button: Click on this
button to edit an existing customer and to make a new Invoice. Go to
Customer List for more information.
2 Copy an Invoice to make a New Invoice button: Find the Invoice
number that you want to copy. Then make sure you are in the prefix book
you want to copy to, type in the number and the prefix of the Invoice to be
copied and the Invoice will be copied over as a new Invoice but tagged as a
quote. When you change it to an Invoice it will take stock out of the
Price book.
3 Load an Old Invoice button: Clicking on this button will bring
up a dialogue box. Type in only the number of the Invoice if it is in the
current book. If you are searching for an Invoice in another book you must
enter in the book prefix letter as well as the invoice number. Click OK
and the Invoice will show.
4 Load last Invoice Worked On button: Clicking on this button
will allow you to go back to the last Invoice you were working on to continue
editing and entering information until finalized.
5 Load Last Invoice in Book or Load button: When this button is clicked the
last invoice in the current book will show.
6 Ageing and Statements button: A dialogue box will show when this
button is clicked. Type in the Book Prefixes you want to look in and click
OK. This will take you to the Aged Statement List. Go to
Aged Statements List for more information.
7 List and Find Invoices button: When this button is clicked it
will take you to the List Invoice Screen. Go to
Invoice List for more information.
8 Quick List All Invoices button: This will list all Invoice just
like button 3, But in one click only.
9 Quick List All Not Paid Invoices button: This will list all not paid
Invoice just like button 3, But in one click only.
0 Customer Service Module button: This button will take you to
the Customer Service List. For more information go to
Services List.
J Load Job Schedule Manager button: This section will let you age
and set readiness of the job to be done so parts can be organized ect..
Job Schedule
Exit Invoicing / Statements button: When this button is clicked you
will then be at the Bizz Wizz Main Menu.
BOOK = This shows you the' Invoice book letter prefix' you are currently
using. To change books use the up and down arrows, However the book
should only be changed when starting a new book .
Do not change the book prefix here when looking for old invoices in other
books, this is not the way to find old Invoices (Use load old Invoice or
Listing Invoice screen)
INVOICE TOTALS:

This window shows Invoice Totals
Invoice Totals is used to add together selected invoices In the selected book
and can also add Job cards and Back orders if selected. Tick and tag the
options that are on the screen and it will show Loyalty points if used, markup
ex Tax, Sell Parts ex Tax, Sell Labour ex Tax, Ex tax Total, Tax Total, Full
Total, Amount Paid and the Not Paid Total.
Total Loyalty Points shows the amount of Loyalty Points on
fully Paid Invoices if used on the selected Invoices.
Total Cost shows the total cost of the parts on the selected
Invoices.
Total Markup Ex Tax shows the Total Markup Ex Tax on the
selected Invoices.
Sell Parts Ex Tax adds together the Total Cost and the Total
Markup Ex Tax on the selected Invoices.
Sell Labour Ex Tax shows the Sell Labour Ex Tax on the
selected Invoices.
Ex Tax Total shows the totaled amounts of Total Cost, Total
Markup Ex Tax, Sell parts Ex Tax and Sell Labour Ex Tax on the selected
Invoices.
Tax Total shows the Tax Total amount of Total Cost, Total
Markup Ex Tax, Sell parts Ex Tax and Sell Labour Ex Tax on the selected
Invoices.
Full Total shows the Full Total of the Tax Total amount
of Total Cost, Total Markup Ex Tax, Sell parts Ex Tax and Sell Labour Ex Tax on
the selected Invoices.
Amount Paid shows the Paid Amounts of the Invoices selected.
Not Paid Total shows the Unpaid Totals of the Invoices selected.
Select the Invoice Book to Add Totals in Type in the book
letter that you want to add the Totals of.
From Invoice Number Type in the number of the Invoice you
want to start from and then type in the number of the Invoice you want to finish
on.
For Sales Person Only Tick this box and then select the sales
person to look at the Invoices you want the total of.. If you do not use sales
people leave this tick box blank.
For Service Person Only Tick this box and then select the service
person to look at the Invoices you want the total of.. If you do not use service
people leave this tick box blank.
No Date Searching Tag this if you are doing a general search
Find in Month and Year When this is tagged it will bring up a
month and year box. This is for searches on Creation Dates only.
Type in the month and year required.
Find in Year Only Tagging this option will bring up the Tax Year
box. Type in the Tax Year you want to search in. This is for searches on
Creation Dates only.
No Text Searching Tag this if you don't want to search for
any text on the selected Invoices.
Find in Job No. Tag this option if you want to include Job
Numbers on the selected Invoices.
Find in Spare No. Tag this option if you want to include
Spare Numbers on the selected Invoices.
Find in Code No. Tag this option if you want to include Code
Numbers on the selected Invoices.
Enter Data to find. Tag this option if you want to include
any data within the above fields on the selected Invoices.
Include Job Cards when Adding Totals Tick this box if
you want to include Job Cards on the selected Invoices when adding Totals.
Include Back Orders when Adding Totals Tick this box if
you want to include Back Orders on the selected Invoices when adding Totals.
Exit button Clicking on this button will take you back to the Main
Menu.
Print Account List button This Prints a list of total for
each account. When this button is clicked a Print option box will
show. Select the Print option to print a list of accounts that meets
the search options.
Print List button This Prints a list of Invoices. When this button is clicked a
Print option box will show. Select the Print option to print a list of
Invoices that meets the search options.
Print Totals button This Prints a Total of Invoices only. When this button is clicked a
Print option box will show. Select the Print option to print a report
of the screen totals.
Total as Selected button Clicking on this button will Total
all the information you have selected to search in the search options.
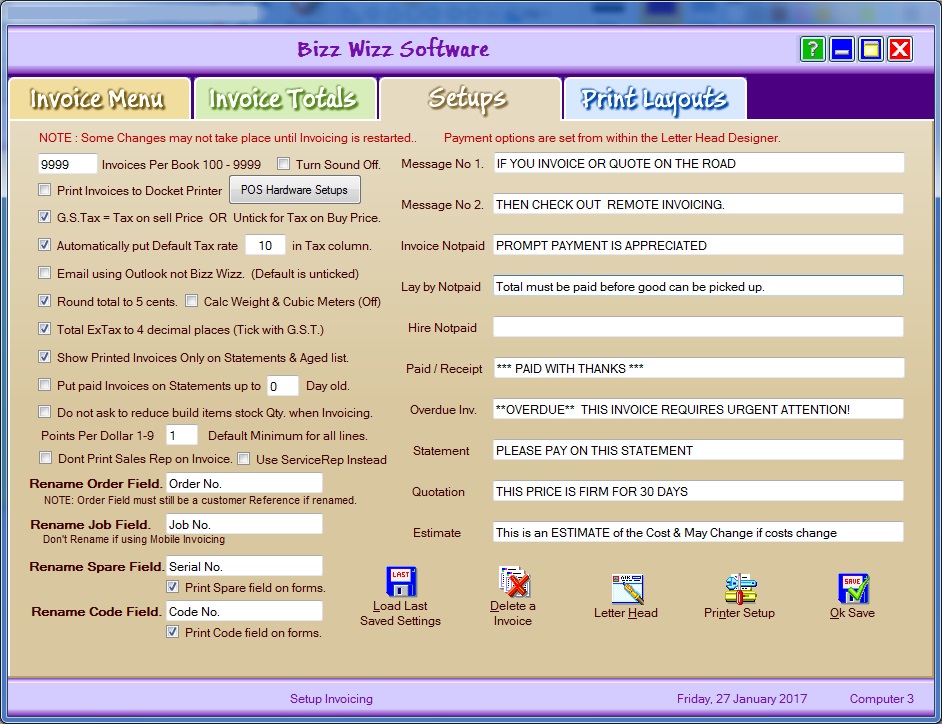
This window shows you the Setups for Invoicing.
Some of these Setups are set by default. Please check the list and tick or un
tick the options that are relevant to your business.
Invoices Per Book 100 - 9999 The number 9999 is a
default figure. If you wish to change the number of Invoices per book,
enter the number you require.
Print Invoices to Docket Printer If this option is ticked
Invoices will be printed to docket printer only.
Pos Hardware Setups Clicking on this will bring up a dialogue box.
Click on Pos setups for more information
G.S.Tax = Tax Tax column On sell Price OR Un tick
for Tax on Buy Price If using G.S.T. this option must be ticked.
Automatically put Default Tax Rate in This box must be ticked if
using G.S.T.
Email using Outlook not Bizz Wizz Tag this option if using
Outlook, untag if using Bizz Wizz to send emails. It is better to send your
email using Bizz Wizz as it links in better. All returned emails will go
to your default email program.
Round total to 5 cents Tag this option if rounding to 5
cents.
Turn Sound Off Tick this box if you do not want to hear messages
ie ( quantity, cancel etc).
Total Ex Tax to 4 decimal places (tick with G.S.T.) Using
this option gives a more accurate figure for G.S.T.
Show Printed Invoices Only on Statements & Aged Screen If you
use the statement feature tick this box.
Put Paid Invoices up to __ Days old If you use the statement
feature tick this box and type in the number of days you want the Invoice to
age.
Do not ask to reduce build items stock qty. when invoicing ( Build on the
fly) This is when you have a build list for an item and you have 0 stock
of that item. you will be asked to reduce the stock on the items in the build
list so you can sell the item with out having you stock qty go out.
Points Per Dollar 1-9 __ Default Minimum for all Lines Enter
the number of of Points Per Dollar. This will show for every line on the
Invoice whether the item comes from the stock book or is manually entered onto
the Invoice.
Don't show Sales Rep on Invoice printouts Just hides the reps name on the
invoice printout.
Use Service Rep instead Tick to swap the sales rep with the service rep when
printing.
Rename Order Field The order field can be renamed. Both
upper and lower case must be used. Due to size restrictions keep the name
change to a minimum.
Rename Job Field The Job field can be renamed. Both
upper and lower case must be used. Due to size restrictions keep the name
change to a minimum.
Rename Spare Field The Spare field can be renamed. Both upper
and lower case must be used. Due to size restrictions keep the name change
to a minimum. This field can also be printed on Invoices.
Rename Code Field The Code field can be renamed. Both upper
and lower case must be used. Due to size restrictions keep the name change
to a minimum. This field can also be printed on Invoices.
Message No 1 Click and type in any message you would
like to print on your remittance. Upper and lower case can be used or just
upper case. If upper case only is used, consider the length of the message
as there are character size limitations.
Message No 2 Click and type a second message you would
like to print on your remittance. Upper and lower case can be used or just
upper case. If upper case only is used, consider the length of the message
as there are character size limitations.
Invoice Not Paid Click and type any message you would like to
print on your remittance. Upper and lower case can be used or just upper
case. If upper case only is used, consider the length of the message as
there are character size limitations.
Hire Not Paid Click and type a second message you would like
to print on your remittance. Upper and lower case can be used or just
upper case. If upper case only is used, consider the length of the message
as there are character size limitations.
Paid / Receipt Click and type in any message you would like
to print on your remittance. Upper and lower case can be used or just
upper case. If upper case only is used, consider the length of the message
as there are character size limitations.
Overdue Inv. Click and type in any message you would like to
print on your remittance. Upper and lower case can be used or just upper
case. If upper case only is used, consider the length of the message as
there are character size limitations.
Statement Click and type a second message you would like to
print on your remittance. Upper and lower case can be used or just upper
case. If upper case only is used, consider the length of the message as
there are character size limitations.
Quotation Click and type in any message you would like to
print on your remittance. Upper and lower case can be used or just upper
case. If upper case only is used, consider the length of the message as
there are character size limitations.
Estimate Click and type a second message you would like to print
on your remittance. Upper and lower case can be used or just upper case.
If upper case only is used, consider the length of the message as there are
character size limitations.
Load Last Saved Settings button Clicking this button will
load the last saved settings in Invoicing.
TIP: Save settings on one computer have this screen open on another and
press load last. This will load a copy of first computers settings.
Delete an Invoice button When you click this button a
dialogue box will show so you can enter the Invoice you wish to delete.
The book prefix must also be entered
Letter Head button Clicking on this button will show and
allow you to edit your Letter Head. This section is also where you enter
your payment options for your customers to pay you.
Printer Setup Button Click this button to set and select the
printer you are using.
OK Save button Click on this button to go back to the Main
Menu of Invoicing.
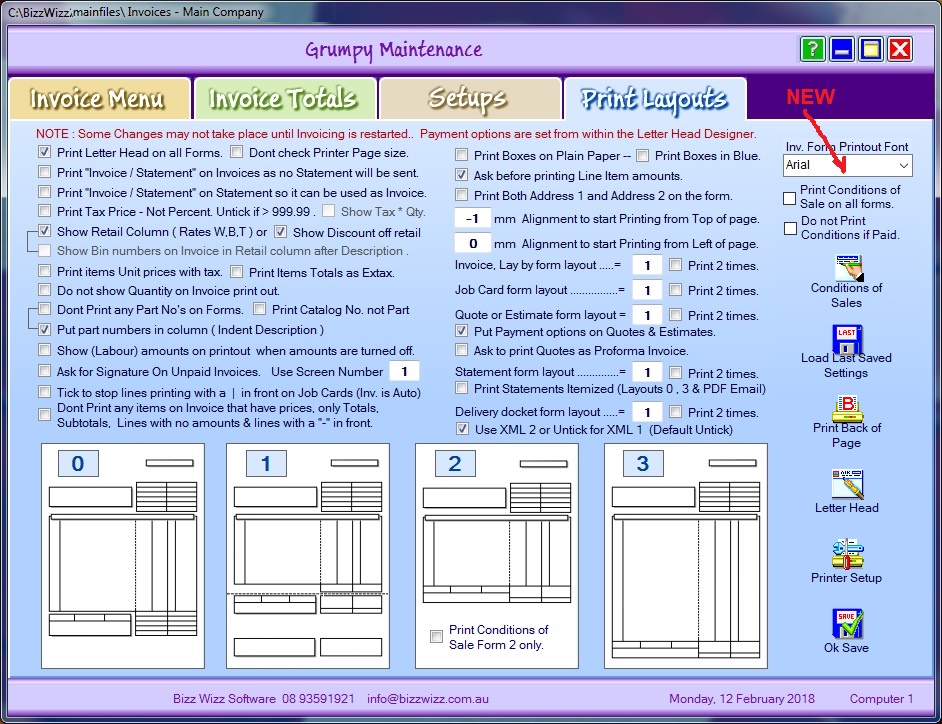
This window shows the Print Layout window
Print Letter Head on all Forms Ticking this option will print
your Letter Head on all Invoices. If you are using your own pre-printed
Letter Head Invoices do not tick this box.
Print "Invoice / Statement" on Invoices as no Statement will be sent
Tick to print "Invoice / Statement" on Invoices if you don't send
Statements.
Print "Invoice / Statement" on Statements so it can be used as a
tax Invoice if the Invoice was lost.
Tick to print "Tax Invoice / Statement" on Statements if you don't send
Invoices or there get lost the customer can then clam GST on the statement.
Print Tax Price - Not Percentage. Untick if tax is > $999.99.
When this option is ticked the tax amount will be printed as an amount not as a
percentage, ie 10%. If the tax amount is greater than $999.99 then dont
tick this option as number will not fit in the column.
Show Tax * Qty. When this option is ticked the tax amount will be printed
as an amount of ' Total Tax' not the ' Unit Tax Amount'.
Show Retail on forms with Rate ( Wholesale, Bulk & Trade )
Tick this option to show Retail prices on Invoices for customers with W, B and T
discounts.
OR
Show Bin numbers on Invoice forms in Retail Column after description.
Tick this option to show Bin numbers on Invoices for picking of parts quickly.
Print item Unit prices with Tax on Printouts . Tick this option
to show Line Item Unit prices with Tax on Printouts.
Print item Totals as Ex Tax on Printouts . Tick this option
to show Line Item Totals as ex tax on Printouts.
Don't Print Part Numbers on Forms When this option is ticked
part numbers will not print on forms.
OR
Put part numbers in column ( Indent Description ) Ticking
this option will make the part number look like it has it's own column.
Show ( Labour ) amounts on printout when amounts are turned off
Tick to show Labour amounts on printout when amounts are turned off, just like
subtotals and totals.
Ask for Signature on unpaid Invoices. If you have a touch screen or
a second screen which is a touch screen then a Signature can be added to the
invoice.
Use Screen Number this sets the touch screen to do the signing on.
Tick to stop lines printing with a "|" in front on job cards. If
you put a "|" at the start of the line on a "Invoice" the line will NOT print,
but it will print on a "Job Card" if this option is not ticked.
Don't Print any items on Invoice that have prices, only Totals, Subtotals,
Lines with no amounts & lines with a "-" in front Tick to stop
the printing of items on the Invoice that have prices next to them. Print
only Total lines and No Price Lines.
{Top right of page}
Print Boxes on Plain Paper Tick to print boxes on plain white
paper.
Print Boxes in Blue Ticking this option will print Blue Lines
on plain paper instead of black.
Invoice form Printout font is the Font for the
base Invoice text that can
be changed on screen and printouts.
Ask before printing Line Item amounts Tick to ask if you want
to print each Item's line amounts.
Print Both Address 1 and Address 2 on form Tick this option to print both
addresses on an invoice printout NOTE : fold line will print on the left hand
side of print out for DL window Envelopes
mm Alignment to start printing from Top of page Enter
the number relevant to your printer as all printers are different.
mm Alignment to start printing from Left of page Enter
the number relevant to your printer as all printers are different.
? is One of the four layout 0,1,2 & 3
Invoice, Lay buy form layout = ?.
Print 2 times Select which layout you prefer and tick the box if
you want to print twice.
Job card form Layout
= ?. Print 2 times Select
which layout you prefer and tick the box if you want to print twice.
Quote or Estimate form Lay out = ?.
Print 2 times Select which layout you prefer and tick the
box if you want to print twice.
Put Payment options on Quotes & Estimates. When this option is
checked the how to pay options will print on a quote.
Ask to print Quotes as a Proforma Invoice
Statement form Layout
= ?. Print 2 times
Select which layout you prefer and tick the box if you want to print twice.
Print Statements Itemized (Layouts 0, 3 & PDF Email) Tick to
itemize Statements with all details on the Invoice listing. You must
select form 0 or 3 for Statements and PDF Email
Delivery docket form layout = ?. Print 2 times
Select which layout you prefer and tick the box if you want to print twice.
Use XML 2 : an Invoice can be sent to an xml file and then emailed.
Xml 1 is a standard xml.
Xml 2 is for Bunnings hardware stores.
Xml is used
for companies that have an auto read of Invoices and the Invoice is read into
there system without human processing.
Load Last Saved Settings button When this button is clicked
it will bring up a dialogue box saying you are loading the last saved setups.
Click OK or cancel to change previous Invoice setups.
Conditions of Sale button A dialogue window will show when
this button is clicked to allow you to enter your conditions of sale.
(On picture of form 2 ) is Print Conditions of Sale Form 2 only
When this option is checked the Conditions of sale will print at the bottom of
form 2
Print Conditions of Sale on All forms When this option is
checked the Conditions of sale will print on the last page of each Invoice ect.
The Conditions will print in the body of the invoice, if there is not enough
room a new page will be started.
Do Not Print Conditions if Paid When this option is checked the
Conditions of sale will Not print if the Invoice is Paid.
Print Back of Page button When this button is clicked your
conditions of Sale will be printed on the back of your Invoice. A dialogue
box will ask you if you want to print payment details on the back of your
Invoice. Select yes or no. Another dialogue box will ask you how
many pages you then want to print. Type in the number of pages, click OK
and the print menu will show, then click on print.
Letter Head button Clicking on this button will bring up the
form to enter your Business name details. Go to
Designer
Printer Set up button Click on this button to select the
printer you are using and it's settings
NOTE: Default Setting for your print should be setup in the windows
control panel in Printers.
OK Save button Click this button to return to the main menu
Of Invoicing and to save settings